Custom Properties
Summary
Custom Properties allow game creators to assign values like numbers, colors, and references to other objects as a part of one object, template, or script. These values can be edited in the editor or during runtime to allow for easy customization and to give something its own configuration or personality.
These allow for easy referencing in scripts or changing variables through the Properties window, rather than directly through code.
Adding Custom Properties
There are two major ways to add a custom property to an object.
- Add Custom Property Button in the Properties window.
- Drag-and-Drop from Hierarchy / Core Content window.
Add Custom Property Button
This is the best option for many simple data types like strings, numbers, and booleans.
- Click on the object that the custom property should be assigned to.
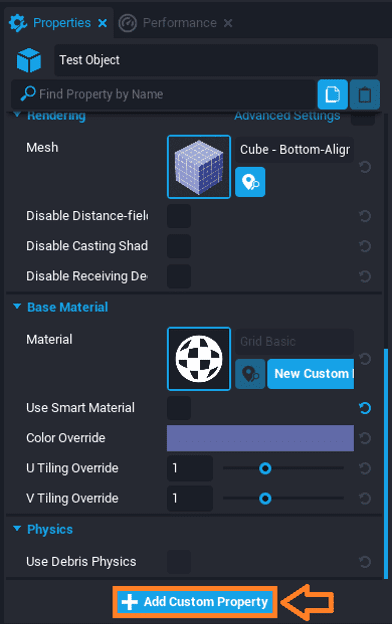
- Click on the Add Custom Property button at the bottom of the Properties window.
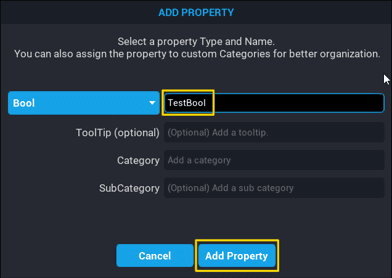
- Click on the data type the value of the custom property will contain.
- Type the name the custom property will be referred by.
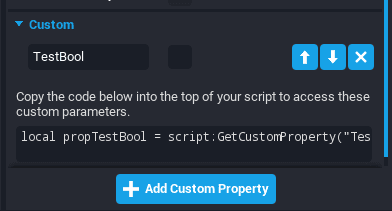
- Edit the value of the custom property as needed.
Drag-and-Drop
This is the best option for complex/advanced data types like Core Object References, Asset References, and Net References.
- Click on the object that the custom property should be assigned to.
- Hold click on the other object that will be the custom property for the first object.
- Drag the other object into bottom of the Properties window of the first object.
Adding Tooltips to Custom Properties
Adding tooltips to custom properties is useful for adding a description to explain what the custom property is for. This is very useful when sharing content, such as publishing to Community Content. When the custom property is hovered over, the tooltip will be displayed and contain the information set by the creator.
There are 2 ways to add a tooltip to a custom property.
-
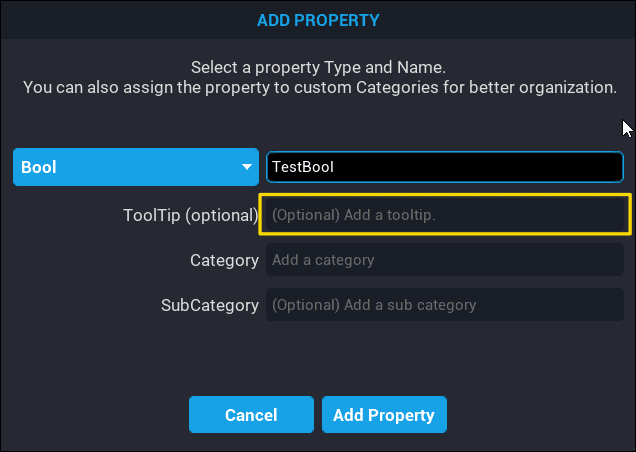
When creating a custom property.
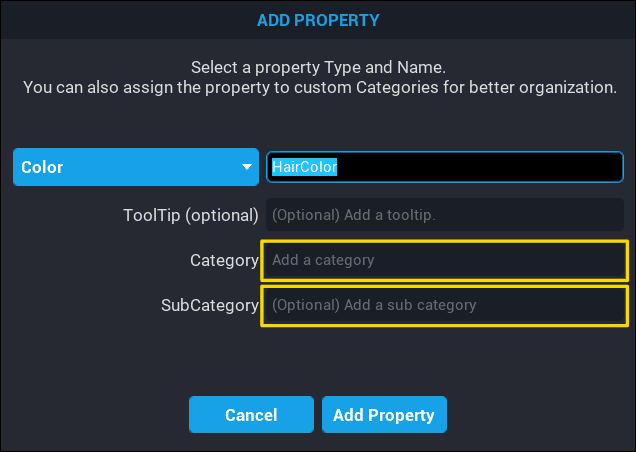
When a custom property is being created, there is an option in the Add Property popup window to set the tooltip.
-
Edit existing custom property.
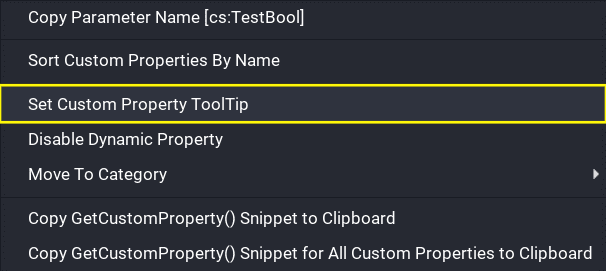
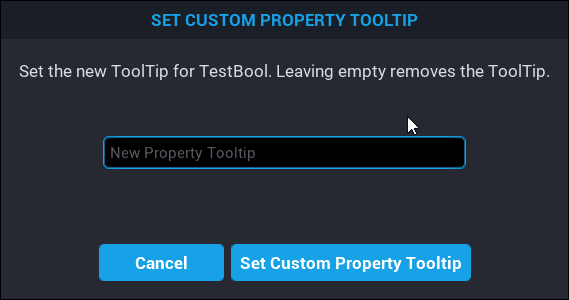
Existing custom properties can have a tooltip set by right clicking on them, and selecting Set Custom Property ToolTip.
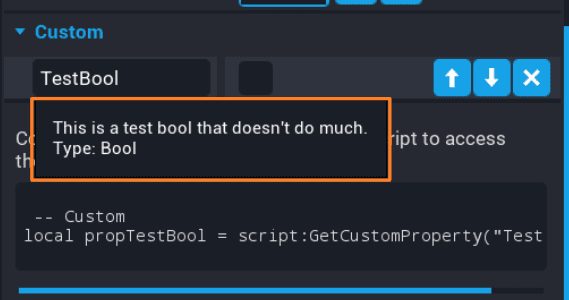
When hovering over a custom property that has a tooltip set, it will display a box with the information set as the tooltip.
Add Custom Property Categories
Custom properties can be placed inside custom categories. This can be a good way of organising the custom properties so it easier to manage when there is a large number of custom properties.
Create a Category
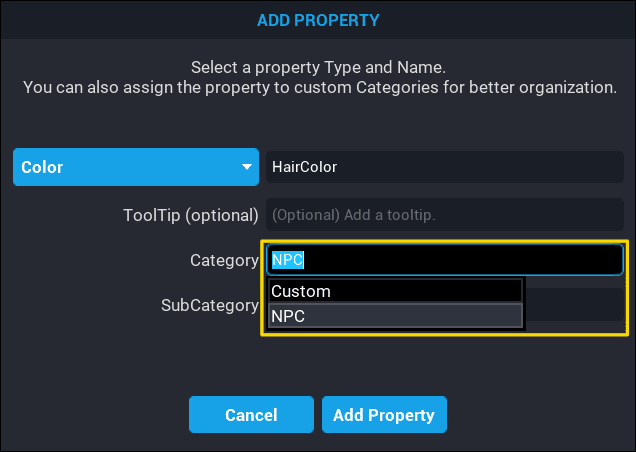
When adding a new custom property, the Add Property popup window has fields where a Category can be selected, or created, and a Sub Category can be selected, or created.
To create a new Category, click inside the Category field and type the category to be created. The same applies for Sub Category. A custom property can have a root Category and a Sub Category.
Add Custom Property to Category
Adding a property to a Category or Sub Category can be done from 2 locations.
-
Add Property Popup Window.
When creating a new custom property, clicking inside the Category field will list any existing categories that have been created. Select the category to add the custom property too. This also applies to Sub Categories.
-
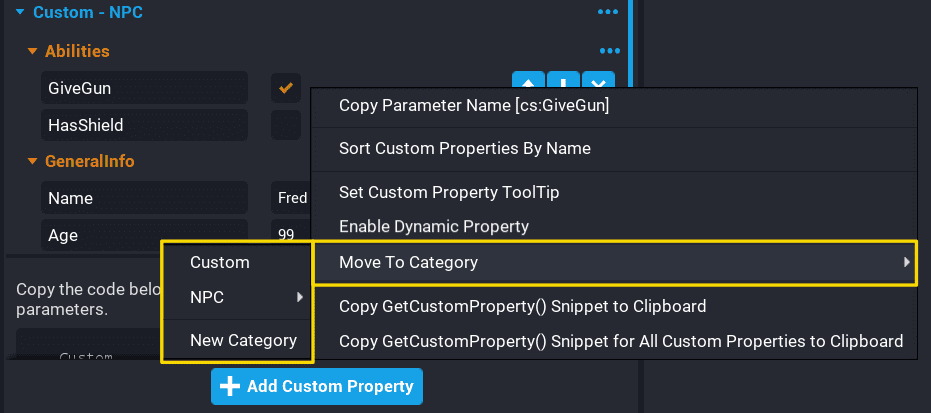
Move to Category.
From the Properties window, custom properties can be moved to a category. Right click on the custom property to be moved, select Move To Category, and select the category.
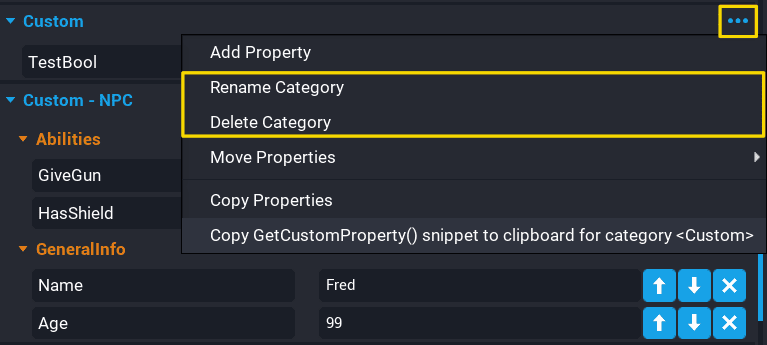
Rename or Delete Category
Renaming or deleting categories can be done from the options panel from the Properties window.
Copying Custom Properties
Custom Properties can be copied and pasted to other objects.
- Click on the object that the Custom Properties should be copied from.
- Right-click on or around the Add Custom Property button at the bottom of the Properties window.
- Click Copy All Custom Properties.
- Click on the object that the Custom Properties should be pasted to.
- Right-click on or around the Add Custom Property button at the bottom of the Properties window.
- Click Add Copied Custom Properties.
Note
Core will automatically copy-and-paste all of the custom properties of the original object when it is duplicated.
Referencing Custom Properties Through Script
A custom property can be assigned to a variable in a script for easy reference and editing.
In the script, for each custom property being referenced, there are two options for referencing it:
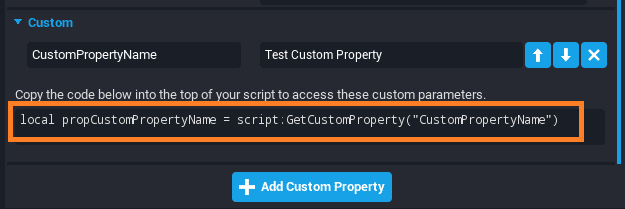
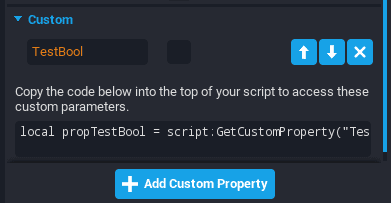
1) Use the auto-generated line in the Custom section of the Properties window for convenience.
2) Use the script:GetCustomProperty() function of CoreObject. More information in the CoreObject API Reference.
local CustomPropertyName = script:GetCustomProperty("CustomPropertyName")
This is automatically generated in the Custom section of the Properties window for convenience.
Note
Custom Properties can be applied to any object, not just a script. Replace script with whatever object that the custom property being retrieved is on.
Changing Custom Property Values Through Script
Custom properties can by edited during runtime through scripts if the object is networked and custom properties are dynamic.
Enable Networking
Firstly, the object and the custom property must have networking enabled for the custom property to be edited during runtime. An error will occur if it is not networked.
- Right-click on the object.
- Click Enable Networking. The object should have
(networked)at the end of its name when viewed in the Hierarchy. - Right-click on the custom property that will be edited during runtime.
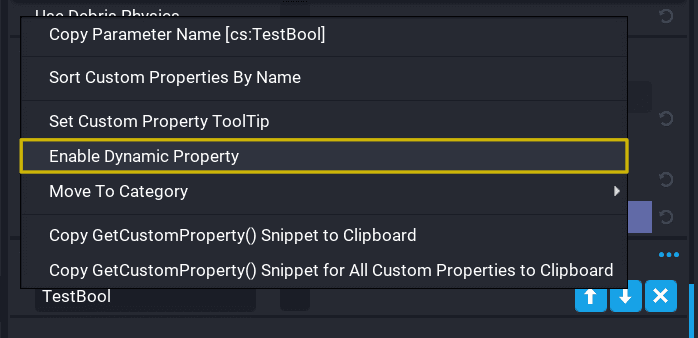
- Click Enable Dynamic Property. The custom property should be orange now.
Change the Value of the Custom Property
To change the value of the custom property of a CoreObject use the CorObject:SetCustomProperty() function of CoreObject. More information in the CoreObject API Reference.
For example, to set the TimeRemaining custom property of a Cube to 10 (in seconds), type:
CubeObject:SetCustomProperty("TimeRemaining", 10)
This will change the value of the custom property to be 10 and will be replicated to the client.
Note
The script will error if the new value is either not the same data type as the custom property or if the custom property is not networked.
Listening to the Custom Property Changed Event
When a custom property is changed, an event, CoreObject.customPropertyChangedEvent, is fired on the object. More information can be found in the CoreObject API Reference.
An example listener to this event:
function OnCustomPropertyChanged(coreObject, customPropertyName)
    local newValue = coreObject:GetCustomProperty(customPropertyName)

    print(string.format("New value of %s for %s is now %s", customPropertyName, coreObject.name, newValue))
end

CorObject.customPropertyChangedEvent:Connect(OnCustomPropertyChanged)
Simple Data Types
For more information on simple data types such as string, number, and boolean, check out our Data Types Reference.
There are a few simple data types supported as custom properties.
| Data Type | Description |
|---|---|
| Bool | A Boolean is only ever true or false. This can be best compared to on/off, yes/no, etc.In custom properties, they are expressed as a check box that is either checked ( true) or unchecked (false).Booleans are most often used in if-statements that allow creators to write code that is only executed if certain conditions are met, such as the boolean being true. |
| Color | A Color is a Core class that contains values for red, green, blue, and alpha (transparency).Colors are helpful constants that can assist in UI programming, spawning assets of different colors, etc. More information can be found in the Color API. |
| Float | A Float is a number that can have decimals, such as 0.1, 1.2, 139.8, etc. |
| Int | An Int is a number that can not have decimals and must be whole, such as 0, 1, 139, etc. |
| Rotation | A Rotation is a Core class that contains values for x, y, and z on rotation axis.More information can be found in the Rotation API. |
| String | A String is a collection of any value, such as numbers, letters, punctuation, and emojis. They are represented in double quotes (" ") in code so that the computer does not mistake them for code. However, this is not necessary for custom properties as String custom properties are represented as a text box that can be typed in. |
| Vector2 | A Vector2 contains values for x and y and is usually useful for storing UI positions/size or any two-dimensional structures.More information can be found in the Vector2 API. |
| Vector3 | A Vector3 contains values for x, y, and z and is usually useful for storing 3D positions/size or any three-dimensional structures.More information can be found in the Vector3 API. |
| Vector4 | A Vector4 contains values for x, y, z, and w and is useful for any four-dimensional structures.More information can be found in the Vector4 API. |
| Simple Curve | A Simple Curve contains keyframes with a curve connecting the points to be used to get values at any point in time. More information can be found in the SimpleCurve API. |
Advanced Data Types
The advanced/complex data types that are supported as custom properties are:
- Core Object Reference
- Asset Reference
- Net Reference
Core Object Reference
A Core Object Reference contains a value that points to any object in the Hierarchy.
When getting this reference into a variable, :WaitForObject() needs to be added to the end of the line to make sure the object is loaded and exists in the game.
More information can be found in the CoreObjectReference API and the CoreObject API.
For example, rotating a cube 45 degrees every 2 seconds.
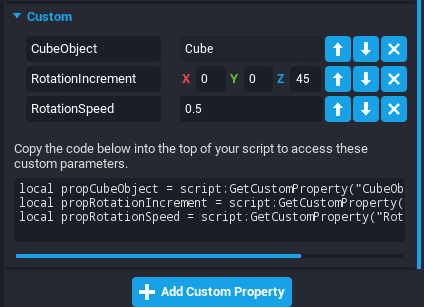
1) Add a Core Object Reference custom property to the script referencing Cube called CubeObject.
2) Create a Rotation custom property to the script called RotationIncrement.
3) Create a Float custom property to the script called RotationSpeed.
Then, add this to the script.
local CubeObject = script:GetCustomProperty("CubeObject"):WaitForObject()

local ROTATION_INCREMENT = script:GetCustomProperty("RotationIncrement")
local ROTATION_SPEED = script:GetCustomProperty("RotationSpeed")

CubeObject:RotateContinuous(ROTATION_INCREMENT, ROTATION_SPEED, true) -- true for local space
Note
If the cube does not rotate and produces an error, make sure it is networked by right-clicking on it then clicking Enable Networking
Asset Reference
An Asset Reference contain a value that points to a script or template in the Project Content window.
This includes referencing Templates so that they can be spawned without having to copy-and-paste the MUID and referencing scripts to be required and used throughout the script.
Requiring Scripts
An Asset Reference can be used to require scripts and gain access to its properties and functions. This is commonplace for APIs/Modules that include a table of values/functions to be used between scripts.
Say that there is a script Asset Reference custom property called SampleAPI, it can be included into the script by using require, similar to script.context, to get what was returned from the script.
For instance, say the contents of SampleAPI was:
local SampleAPI = {}

function SampleAPI.TestFunction()
    print("Hello, world!")
end

return SampleAPI
Then, use the TestFunction function of the SampleAPI script by typing:
local SampleAPI = require(script:GetCustomProperty("SampleAPI"))

SampleAPI.TestFunction() -- prints "Hello, world!"
Spawning Templates
An Asset Reference can be used to point to templates that can be spawned into the game. If there is a template referenced called "CubeTemplate", it can be spawned by typing:
local CubeTemplate = script:GetCustomProperty("CubeTemplate")

local spawnedCube = World.SpawnAsset(CubeTemplate)
Net Reference
A Net Reference contains a value that points to a Leaderboard, a Shared Storage Key, or a Perk which are data that is stored on the Core backend and are accessible across all your projects.
More information can be found at the Leaderboards Tutorial, the Shared Storage Tutorial, and the Perks Tutorial.
Learn More
CoreObjectReference API | CoreObject API | CoreObject GetCustomProperty | CoreObject SetCustomProperty | CoreObject CustomPropertyChangedEvent | Data Types Reference | Color API | Rotation API | Vector2 API | Vector3 API | Vector4 API | Leaderboards Tutorial | Shared Storage Tutorial | Perks Tutorial
