Advanced Abilities in Core
Overview
While both weapons and abilities can be utilized without having to code, if you do use scripting, so much more is possible.
With the power of Lua scripting, abilities can cause different chains of events to happen, as well as trigger visual effects and sound effects to really make something awesome.
In the first tutorials for abilities and weapons, we went over the quickest possible way to get something cool happening at the press of a button. In this more advanced tutorial, we are going to utilize the Lua scripting language to make something much more powerful and fun.
If you're fresh and new to any kind of programming, it would be good to visit the Intro to Lua tutorial. This will go over some key words and practices you would want to know.
- Completion Time: ~30 minutes
- Knowledge Level: No knowledge absolutely required, but would be easier to understand with a grasp on Lua and completion of the first Weapons tutorial
- Skills you will learn:
- How the Ability system works behind-the-scenes
- How to program abilities
- How to manipulate the camera view
- How to program damage changes
- How to make ammo into a pickup for reloading
Before doing this tutorial, make sure you've already gone through the Ability tutorial and the Weapon tutorial to understand the basics of how these things work.
We're going to be making a more complex weapon that utilizes scripting, and has multiple abilities.
To really see the power that the ability system gives us to make cool gameplay mechanics, you should understand what is happening behind the scenes of an ability.
The 4 Phases of an Ability
In Core, an ability is treated as 4 separate steps that happen immediately one right after another. This allows for distinctly different things to be programmed by a creator in each phase, creating a more complex overall ability.
The 4 different phases of an ability are:
- Cast
- The wind-up time--this is the prep phase before the ability actually happens.
- Execute
- The actual ability.
- Whatever the ability is going to do, it happens at this moment.
- Recovery
- Additional ability actions that aren't part of the main action.
-
Cooldown
- The rest period after an ability is finished being cast, and cannot be cast again.
A More Natural Example
Try thinking of it like the casting of a magical spell:
Cast: The witch charges up her spell, twirling her wand in the air in preparation.
Execute: The witch flicks her wand, launching magic sparks at her enemy.
Recovery: Out of breath from the power, the witch lowers her arm.
Cooldown: The witch waits for her magic powers to return to her.
Once an ability is triggered to start, it cycles through Cast > Execute > Recovery > Cooldown. The amount of time that each phase lasts can be set in the code. These timings would be very different depending on the type of ability being created.
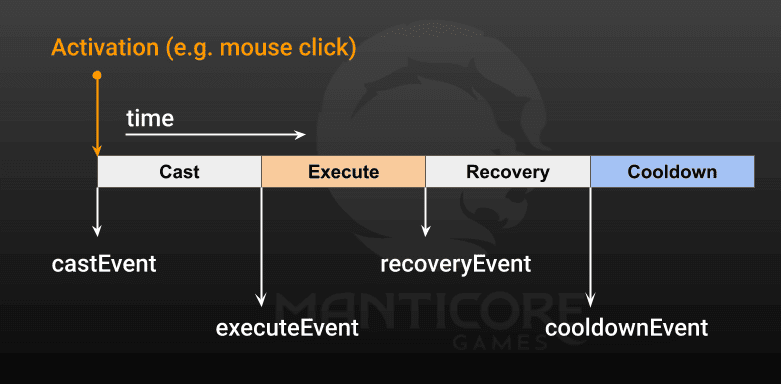
To tie functionality to the different phases of an ability, Core uses Events. Each phase has an event that is activated at the very beginning of that phase.
A created function can be connected to these events, using :Connect(ability_name) within a script.
Connecting functions to events in an ability is the main task to be done when creating an ability, and is what makes each one different and infinitely customizable.
Customize Your Ability
A magical spell might have a long cast time, whereas a punch would have a very short if not instant cast time.
Altering Properties the Easy Way: The Ability Object
Core allows building gameplay with as little or as much scripting as you would like. A powerful aspect of abilities is that they are kept in an Ability Object. This is a single Hierarchy object that holds all the most useful properties you might want to change to make your specific ability unique.
Using an Ability object in combination with scripting makes it similar to a data structure; an ability object is a nice single location to test different variables.
Tutorial
In this tutorial, we will be making a magic fire staff that the player can pick up, granting them two different abilities: a left-click fire burst and a right-click charged fire bomb.
Setting up the Basics
To begin, let's set up the look of the fire staff and create our weapon object. Open the project you wish to use, or an empty project.
-
Create an empty
weaponobject by dragging one into your Hierarchy from the Gameplay Objects section of Core Content. -
With the new
weaponselected in the Hierarchy, press F2 to change its name to Fire Staff. -
Just like in the first weapon tutorial, we are going to create a Client Context folder within the weapon to hold the model of the staff.
You can combine shapes in whatever way you like with the help of an Art Tutorial or Reference.
Make sure to turn off the collision of the art group that you make, so that the camera doesn't get stuck on it when it is equipped.
-
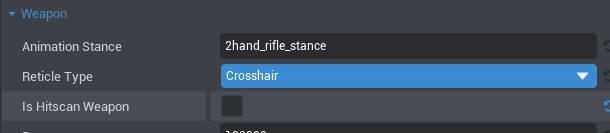
In the weapon's Properties, make sure to uncheck the box for "Is Hitscan Weapon" so that is still fires actual projectiles. Hitscan weapons have immediate impact on whatever they're firing at, so the projectile wouldn't need to travel through the air first. But that would mean no cool fireballs soaring through the air.
-
Create a bullet template, following the same steps as in the first weapon tutorial--go for something thematic like a sphere with a custom Plasma material applied.
Modifying the Animations
Since we're making a magic staff and not a typical gun, we get to change the animations to something more fitting.
- Select the Fire Staff
weapon. In the Weapon section of the Properties window, change the Animation Stance to "2hand_staff_stance" so that it looks better when you're walking around holding the staff. - On the AttackAbility that already exists on the weapon, change the Animation in the Properties window to "2hand_staff_magic_bolt" as well.
- On the ReloadAbility, change the Animation to "2hand_staff_magic_up" to make it look like you're calling upon the magic of the fire gods to be rejuvenated.
Explosive Visual Effects
Use the VFX section of the simple weapon tutorial to create cool VFX for your weapon, and lean into fire themes to match the look of this fire staff--the most impactful sections of the weapon to change are:
-
The Muzzle Flash Template
- This is what happens the moment the weapon is fired.
-
The Impact Surface Aligned
- Is activated the moment a projectile hits a surface that is not a player.
-
The Impact Player Effect
- Activated the moment a player is hit with a projectile.
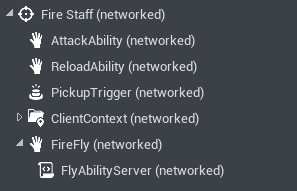
Fire Fly Ability
Add Ability
- Add another
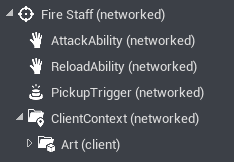
abilityto the fire staffweaponas a child by dragging it in from the Gameplay Objects section of Core Content. - Change the name of the ability to "FireFly".
Create FlyAbilityServer Script
- Create a new script, and call it "FlyAbilityServer"--this is where all the code for causing the ability to happen will go.
-
Drag this new script into the Fire Staff, on top of the FireFly ability, so that it becomes a child of that ability.
-
Open the script and let's get typing.
Add Variables
We're going to create a reference to the equipment (which is also the weapon in this case) and a reference to the FireFly ability object so that we can use them in our script.
Type the below code to create variables for the equipment and the ability:
local EQUIPMENT = script:FindAncestorByType('Equipment')
local ABILITY = script:FindAncestorByType('Ability')
The other variable we want to create is a reference to whether or not the player has died. We can use this to turn off the flying state if the player dies.
local diedHandle = nil
Create OnPlayerDied Function
Next is the function that does that turning-off of the flying state by activating walking again:
function OnPlayerDied(player, damage)
    player:ActivateWalking()
end
Create Equipped Functions
The next two functions we need to include are what happens when the weapon is equipped or unequipped, which are primarily used for connecting the ability to turn off flying.
function OnEquipped(equipment, player)
    diedHandle = player.diedEvent:Connect(OnPlayerDied)
end

function OnUnequipped(equipment, player)
    if diedHandle then
        diedHandle:Disconnect()
    end
    player:ActivateWalking()
end
Create Flying Functions
After the equip functions, there are two more functions we'll create that directly turn on and off flying. Add these to the current bottom of your script:
function StartFlying(ability)
    ability.owner:ActivateFlying()
end

function StopFlying(ability)
    ability.owner:ActivateWalking()
end
Connect Events
At the very bottom of the script, we code the main aspect that makes abilities so useful--we connect our functions to the events built within an ability.
Being able to connect functions to an ability's events is how we can control how long each phase takes in the ability object in the Hierarchy.
In this case, we're connecting our functions StartFlying() and StopFlying() to the execute event and the cooldown event.
ABILITY.executeEvent:Connect(StartFlying)
ABILITY.cooldownEvent:Connect(StopFlying)
EQUIPMENT.equippedEvent:Connect(OnEquipped)
EQUIPMENT.unequippedEvent:Connect(OnUnequipped)
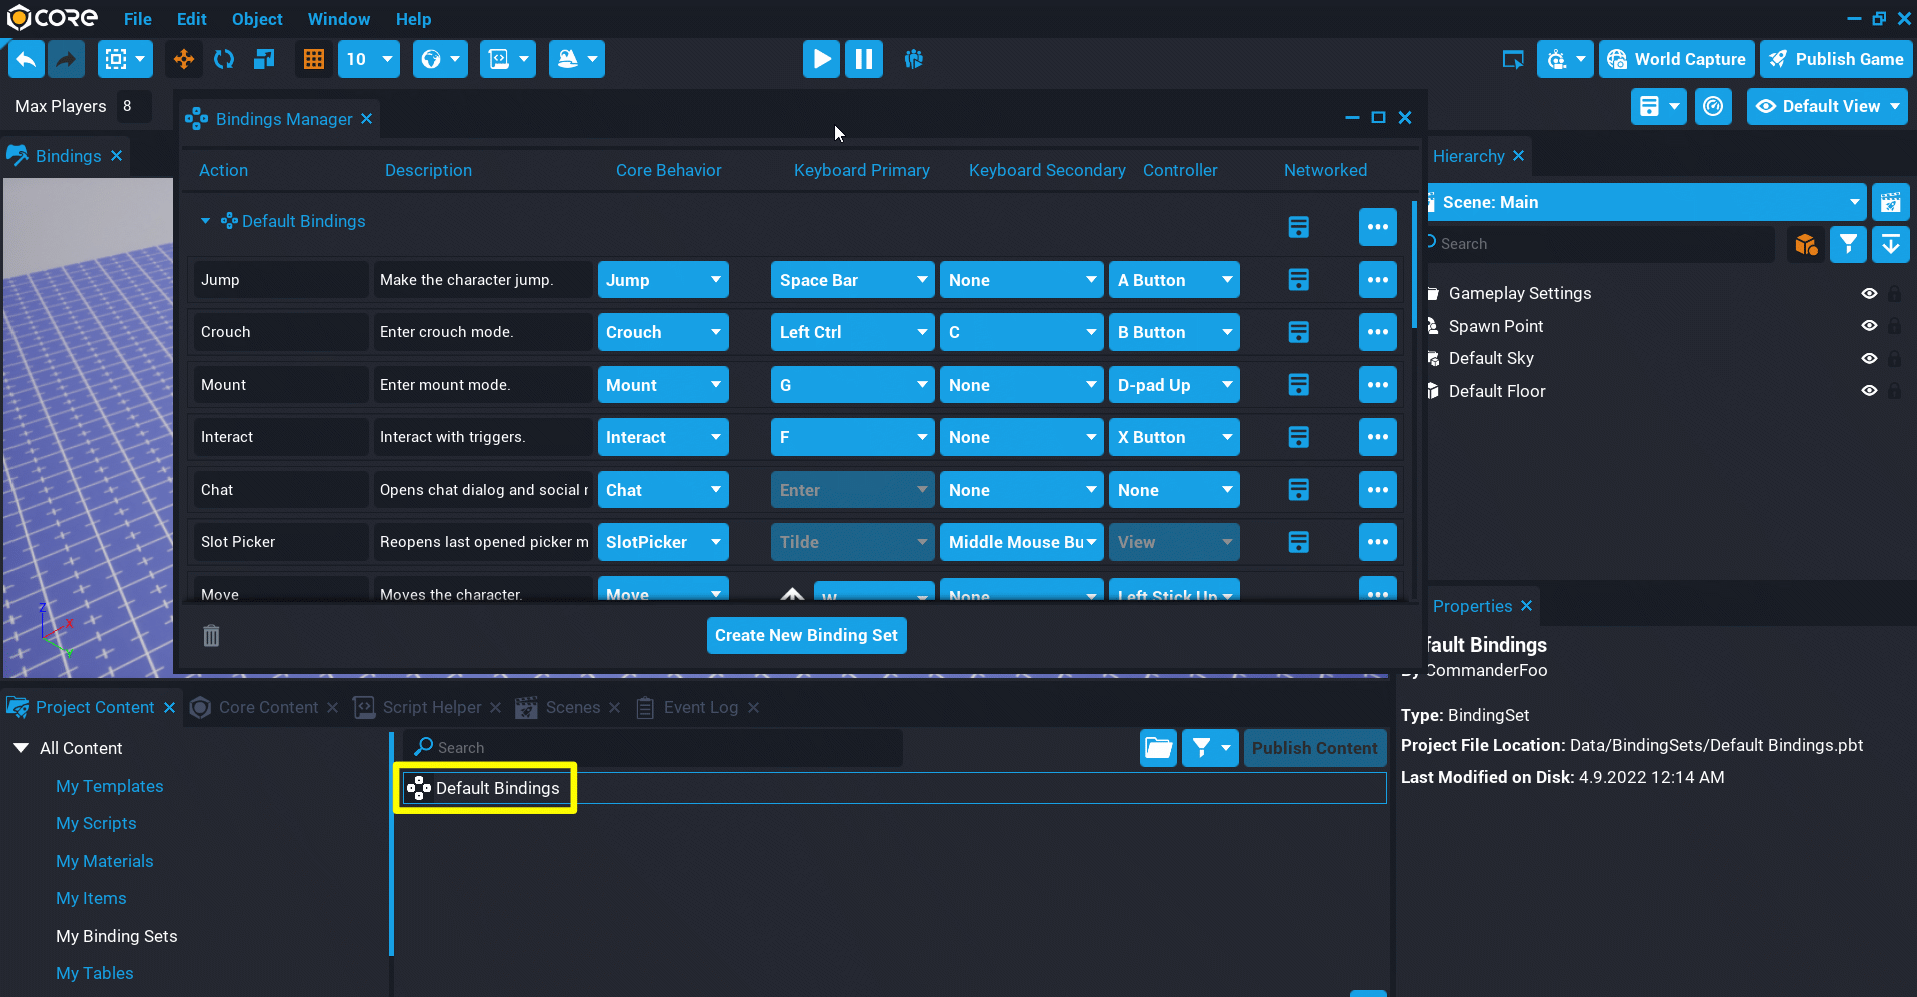
Create a new Binding
The Default Binding set will need a new binding added to detect when the player presses a specific key.
Open up the Bindings Manager window from the Window menu, or by double clicking on the Default Binding set in My Binding Sets found in the Project Content window.
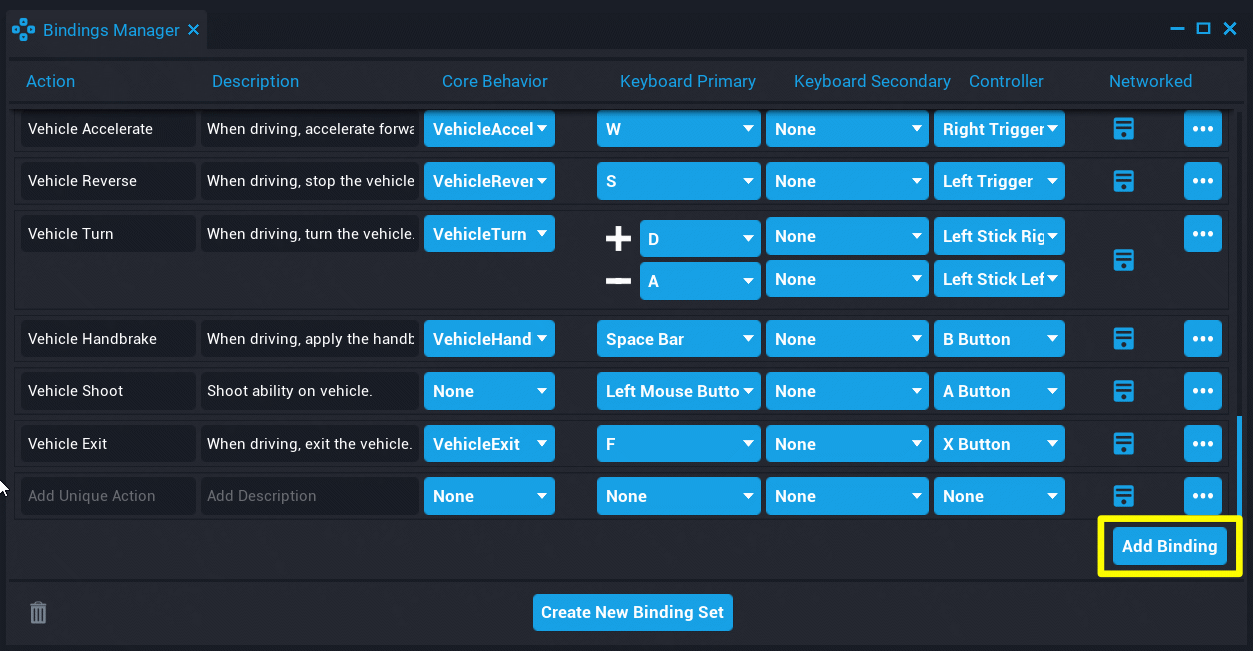
Add Binding
From the Bindings Window, click on the Add Bindings button to add a new row to the binding set.
- In the Action field, enter
Shift. - From the Keyboard Primary drop down, select the Left Shift key.
Adjust Ability Properties
Now that we've written the script for flying to work and added the binding, we can adjust things from simply within the Properties window with the FireFly ability object selected.
This way we can alter the timing of how the ability works, like how long the user can fly, or how long until they're allowed to use the ability again.
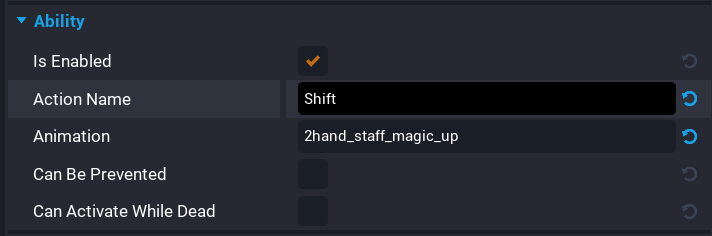
- The first change we're going to make is in the Ability section of the Properties window. Change the Action Name to "Shift".
- Change the Animation to "2hand_staff_magic_up".

- Now in the Cast section, change the Duration to .15.
- Change the Facing Mode to "Movement".
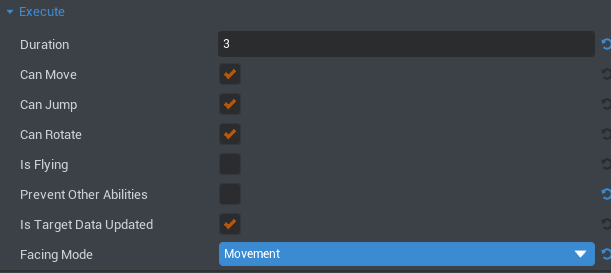
- In the Execute section, change Duration to 3.
- Change the Facing Mode to Movement.
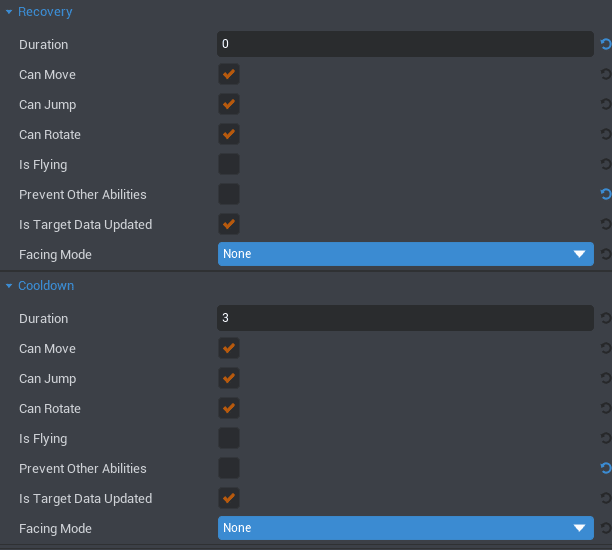
- In the Recovery section, change the Duration to 0.
- In the Cooldown section, change the Duration to 12. Make sure all the other check boxes match these images.
Now this Fire Staff grants the ability to fly when pressing Shift on the keyboard to activate it.
Try it out and feel for the time lengths we entered--maybe you want a short or longer fly time, or a lower Cooldown so that it can be used more frequently. Adjust the values in the Execute and Cooldown sections to change these aspects.
Right Click to Aim
We're going to add the ability to focus zoom with right click for better aiming.
Client-Side Script
-
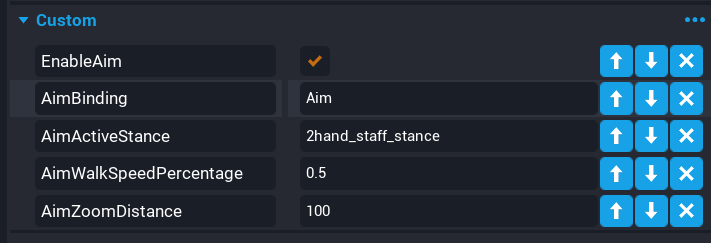
First, we're going to add a bunch of custom properties to the weapon--custom properties give us a nice place to add variables that can be easily changed without having to open the code once it's been written.
- To start we need a custom property added to the weapon object of type Boolean called "EnableAim". Check this on to allow the weapon to zoom in for aiming.
- Add a custom property to the weapon object called "AimBinding" that's of the type String. Give it the value
Aim. This is for picking what action binding to activate the ability. - Add another custom property of type String and call it "AimActiveStance". Set the value to "2hand_staff_stance". This determines what animation pose gets used while aiming.
- Add a custom property of type Float and call it "AimWalkSpeedPercentage". Give it a value of .5. This value will determine what fraction of the regular walk speed the player will move while aiming.
- Lastly for this part, add a custom property called "AimZoomDistance" of type Int, and give it a value of 100. This assigns how far the camera zooms in when aiming.
-
Now we're going to build the script. Create a new script and call it "WeaponAimClient".
-
Open this script, and let's start by accessing our variables.
-
We first want to create a reference to the weapon object, so type this at the top of the script:
local WEAPON = script:FindAncestorByType('Weapon') -
To protect ourselves from putting this script in the wrong place, we can add an error check into the script. Beneath the above line, add:
if not WEAPON then
    error(script.name .. " should be part of Weapon object hierarchy.")
end
This will check if the parent of this script is a
weapon, based on the line we wrote above first. If it is not, it will give us the error message. -
Next we need to create references to those custom properties we made earlier on the weapon. To do this, add the code below to your script:
local CAN_AIM = WEAPON:GetCustomProperty("EnableAim")
local AIM_BINDING = WEAPON:GetCustomProperty("AimBinding")
local ZOOM_DISTANCE = WEAPON:GetCustomProperty("AimZoomDistance")
Just like with the
WEAPONvariable, these variables are in all-capitals. This is because they are constants--meaning they will never change while the script is running. -
Now we need empty variables for use in future functions, so beneath the above variables, add this:
local pressedHandle = nil local releasedHandle = nil local playerDieHandle = nil -
Lastly for variables is creating values to hold the camera settings. Copy or type the text below into your script, below everything else so far:
local cameraResetDistance = 0
local cameraTargetDistance = 0
local lerpTime = 0
local activeCamera = nil
Now we have our variables set up. Next is getting into creating the functions that use these variables.
-
-
To get a better understanding of what we're going to be making, let's set up the
Tick()function.The
Tick()function happens constantly while the game runs, creating a loop of time flowing. The parameterdeltaTimewithin it is the difference in seconds between this tick and the last tick.First, we don't want the script to do anything unless we are actively aiming, so we need a line that breaks out of the
Tickloop.After that line, we use another
ifstatement to determine if the weapon already had an owner, and if not, then it runs theOnEquippedfunction to set up the weapon camera's ownership to the player that equipped it.Lastly, to stay smooth in movement, we use the function
LerpCameraDistance(deltaTime)to smoothly move the camera to a new position.All of this together reads like this:
function Tick(deltaTime) if not CAN_AIM then return end -- Setup the new weapon camera owner if WEAPON and WEAPON.owner and activeCamera == nil then OnEquipped(WEAPON, WEAPON.owner) end -- Smoothly lerps the camera distance when player aims LerpCameraDistance(deltaTime) end -
Now let's tackle one of those functions used in the
Tick()function.First, we'll do the
LerpCameraDistance(deltatime).Below is the code for this function:
function LerpCameraDistance(deltaTime) if lerpTime >= 1 then return end if not activeCamera then return end lerpTime = lerpTime + deltaTime activeCamera.currentDistance = CoreMath.Lerp(activeCamera.currentDistance, cameraTargetDistance, lerpTime) end -
Now we need a function that accesses the camera for the local player, so that we can change it when we want to.
To do this, copy the code below beneath your function from the previous step.
function GetPlayerActiveCamera(player) if not Object.IsValid(player) then return nil end if player:GetOverrideCamera() then return player:GetOverrideCamera() else return player:GetDefaultCamera() end end -
The above is followed directly by another function,
EnableScoping(player). This turns on the aiming.Again, beneath the above code, type:
function EnableScoping(player) if player.isDead then return end cameraTargetDistance = ZOOM_DISTANCE lerpTime = 0 Events.Broadcast("WeaponAiming", player, true) end -
Now we need a function to reset the aiming back to default when not zoomed in.
To reset the camera distance, use the code below.
function ResetScoping(player) cameraTargetDistance = cameraResetDistance lerpTime = 0 Events.Broadcast("WeaponAiming", player, false) end -
These next two functions are specifically for turning on and off being zoomed in--if the player presses the assigned action binding key, then it triggers the functions we wrote to enable and reset scoping.
Add these two functions below to the bottom of your script so far:
function OnActionPressed(player, action) if action == AIM_BINDING then EnableScoping(player) end end function OnActionReleased(player, action) if action == AIM_BINDING then ResetScoping(player) end end -
Now that we've added all these functions for how to initiate aiming, we need to protect for a case that could break how zooming-in works: what happens when the player dies.
To reset the camera back to normal when the player dies, let's add this function:
function OnPlayerDied(player, damage) ResetScoping(player) end -
So, we've added functions for how to make the camera change zoom amounts, but we still need to pull all of this together to connect our functions to the built-in events of Core equipment and player events.
-
We're going to start with making the
OnEquipped()function that we are calling already in the Tick function we first wrote.function OnEquipped(weapon, player) if not CAN_AIM then return end pressedHandle = Input.actionPressedEvent:Connect(OnActionPressed) releasedHandle = Input.actionReleasedEvent:Connect(OnActionReleased) playerDieHandle = player.diedEvent:Connect(OnPlayerDied) -- Set new active camera activeCamera = GetPlayerActiveCamera(player) if activeCamera then cameraResetDistance = activeCamera.currentDistance cameraTargetDistance = cameraResetDistance end lerpTime = 0 end -
Now we need the other half of that, the
OnUnequipped()function that disconnects things and resets data.function OnUnequipped(weapon, player) if not CAN_AIM then return end if (pressedHandle) then pressedHandle:Disconnect() end if (releasedHandle) then releasedHandle:Disconnect() end if (playerDieHandle) then playerDieHandle:Disconnect() end ResetScoping(player) -- Remove the reference to the camera if activeCamera then activeCamera.currentDistance = cameraResetDistance activeCamera = nil end end -
Last but not least, all
weaponobjects come with a built-in unequip event that happens when the player unequips the weapon. So, we need to connect the function that we built to this event to cause our function to happen at the right moment.WEAPON.unequippedEvent:Connect(OnUnequipped)
-
-
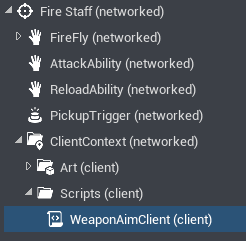
We've written the script, but we can't forget to add it to our fire staff object.
Within the Client Context folder that is holding the art model of the staff, create a new folder and call it "Scripts". Drag the WeaponAimClient script into here.
So this was the first half of the camera aim setup--we have created a script for the client context, that only each individual player uses. The next part is the script that will live in a server context, as this is the part that needs to be replicated back to the server.
Server-Side Script
This server script will seem fairly similar to the client script, but this one is directly changing and affecting variables of the player.
Make sure that the Aim binding in the Bindings Manager is networked so the server script can read the input.
So let's get started on the server script.
-
Create a new script and call it "WeaponAimServer".
-
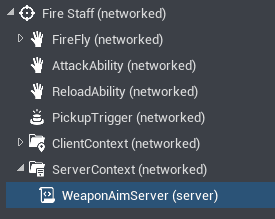
In your project Hierarchy, navigate to the Fire Staff
weaponobject. Right click this object, and hover over "Create Network Context" to select "New Server Context".Here is where we will keep our new script.
-
Drag the WeaponAimServer script into the Server Context folder that we just created.
-
Next is adding in the coding sections--open up the new script to begin.
-
We first need to access the custom variables we created on the
weapon. This will look really similar to the WeaponAimClient script.-
Start with creating a reference to the
weaponitself so that we can find the variables, and the safety error checking we made just like last time.local WEAPON = script:FindAncestorByType('Weapon') if not WEAPON then error(script.name .. " should be part of Weapon object hierarchy.") end -
Now we'll want to create in-script variables that use the custom variables we put on the weapon. To access these, use the code below:
local CAN_AIM = WEAPON:GetCustomProperty("EnableAim") local AIM_BINDING = WEAPON:GetCustomProperty("AimBinding") local AIM_WALK_SPEED_PERCENTAGE = WEAPON:GetCustomProperty("AimWalkSpeedPercentage") local AIM_ACTIVE_STANCE = WEAPON:GetCustomProperty("AimActiveStance") -
Next comes the variables we need to create so that we can use them later:
local speedReduced = 0 local pressedHandle = nil local releasedHandle = nil local playerDieHandle = nil local UNARMED_STANCE = "unarmed_stance"
-
-
Now that we've created our variables, we can get into the function writing. We'll start with a function that sets the walking speed of the player while they are aiming.
Type the following function below all the variables in your script.
function SetAimingSpeed(player) if Object.IsValid(player) and player == WEAPON.owner then speedReduced = player.maxWalkSpeed * AIM_WALK_SPEED_PERCENTAGE player.maxWalkSpeed = player.maxWalkSpeed - speedReduced player.animationStance = AIM_ACTIVE_STANCE end end -
Going along with setting the walk speed, we need a function to reset the player's speed back to normal when they are not zoomed in.
The code below is a function that will reset the player's walk speed--add this beneath the previous function.
function ResetPlayerSpeed(player) if WEAPON and Object.IsValid(player) then player.maxWalkSpeed = player.maxWalkSpeed + speedReduced player.animationStance = WEAPON.animationStance speedReduced = 0 end end -
Similar to the WeaponAimClient script, we now need functions that trigger our speed-modifying functions by binding them to the buttons the player will press.
-
First comes the function for when a button is pressed:
function OnActionPressed(player, action) if action == AIM_BINDING then SetAimingSpeed(player) end end -
Followed by a function for when a button is released:
function OnActionReleased(player, action) if action == AIM_BINDING then ResetPlayerSpeed(player) end end -
Another way we need to reset the speed of the player is when they die--check out the code below for doing this, and add it to the current bottom of your script:
function OnPlayerDied(player, damage) ResetPlayerSpeed(player) end
-
-
The most important functions for bringing this all together are the
OnEquipped()andOnUnequipped()functions. Just like in the other script, but affecting the speed and animations rather than the camera movements, we'll create both.-
Use this code for the
OnEquipped()portion, and as usual, type it directly beneath the previous section:function OnEquipped(weapon, player) if not CAN_AIM then return end pressedHandle = Input.actionPressedEvent:Connect(OnActionPressed) releasedHandle = Input.actionReleasedEvent:Connect(OnActionReleased) playerDieHandle = player.diedEvent:Connect(OnPlayerDied) end -
Then comes the
OnUnequipped()section:function OnUnequipped(weapon, player) if not CAN_AIM then return end if (pressedHandle) then pressedHandle:Disconnect() end if (releasedHandle) then releasedHandle:Disconnect() end if (playerDieHandle) then playerDieHandle:Disconnect() end -- Reset player speed and animation stance on unequip ResetPlayerSpeed(player) player.animationStance = UNARMED_STANCE end
-
-
On to the last step for camera movement. Similar to the WeaponAimClient script, we need to connect the functions we wrote to the built-in events that happen on a
weaponobject.At the very end of your script, beneath all the other functions, add these two lines of code to connect the functions:
WEAPON.equippedEvent:Connect(OnEquipped) WEAPON.unequippedEvent:Connect(OnUnequipped)Now, if you hit play to test out your weapon, you should be able to zoom in when you hold right click.
Critical Hit Headshots
A common aspect of games with player combat is the ability to land a headshot on someone--having both superior and lucky aim is fun to reward, and it can push players to want to improve their aim.
For our Fire Staff, let's set it up to do double damage if a player gets a successful headshot.
-
Select the Fire Staff weapon object in the Hierarchy. We need to change a property, and add our own custom property to it.
- In the Weapon section of the Properties window, look for the property called "Damage" and set its value to 50.
- Using the button at the bottom of the Properties window, add a custom property of type Int and call it "HeadshotDamage". Give this property a value of 100--this way it will kill a player with default health instantly.
-
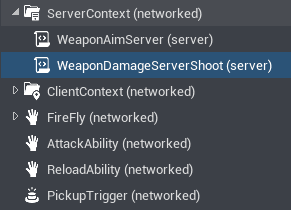
Create a new script and call it "WeaponDamageServerShoot", and drag it into the project Hierarchy on top of the Server Context folder within the Fire Staff. This way it is also contained within the server context.
-
Open the script, and let's begin adding code. This section is relatively short compared to the camera zoom section, as headshot logic is largely built into Core already.
-
First off we'll want the usual reference to the weapon at the top of our script:
local WEAPON = script:FindAncestorByType('Weapon') if not WEAPON then error(script.name .. " should be part of Weapon object hierarchy.") end -
Next comes creating references to the properties we made for damage amount:
local DAMAGE_AMOUNT = WEAPON.damage local DAMAGE_HEADSHOT = WEAPON:GetCustomProperty("HeadshotDamage") -
The biggest and most important section of this is the function for what happens the moment a fireball/bullet/projectile makes impact with something.
Weapons come with data for their impacted target built-in, so we just need to utilize this data to determine whether or not we apply damage and how much damage we apply.
Here is the whole complete function--add this to your script beneath the variables:
local function OnTargetImpacted(weapon,impactData) local target = impactData.targetObject -- Apply damage to target if it's a player if Object.IsValid(target) and target:IsA("Player") then local weaponOwner = impactData.weaponOwner local numberOfHits = #impactData:GetHitResults() -- Assign additional headshot damage if projectile hit enemy's head if impactData.isHeadshot then local additionalDamageInfo = Damage.New(DAMAGE_HEADSHOT * numberOfHits) additionalDamageInfo.reason = DamageReason.COMBAT additionalDamageInfo.sourceAbility = impactData.sourceAbility additionalDamageInfo.sourcePlayer = weaponOwner -- Apply additionaldamage to the enemy player target:ApplyDamage(additionalDamageInfo) end end end -
Finally, we're going to connect the function we just made to the built-in event on the weapon:
WEAPON.targetImpactedEvent:Connect(OnTargetImpacted)
-
-
To test this and make sure everything is working correctly, we'll need to add a Team Settings object to our game.
-
In Core Content, scroll down to the Game Objects section and select the Settings Objects category. Drag a Team Settings object into your project Hierarchy. Make sure it is not within the Fire Staff.
-
With Team Settings selected in your project Hierarchy, check the Properties tab. Change the Team Mode to Free For All.
Now that we've set the game mode to Free For All, any test AI bots that we spawn we will be able to shoot at.
-
Turn on Multiplayer Preview Mode, and set the number of players to 3. Now when hitting play you can test out how the headshot system works.
-
Ammo as a Pickup
One way to really change gameplay and force players to explore a map and be more resourceful is to give the weapon a limited ammo supply. Eventually, they'll have to go look for more.
With this fire staff, we could use something thematic and fiery like ember as an ammo pickup.
The main thing to change for our ammo supply is to change the properties of the weapon itself.
-
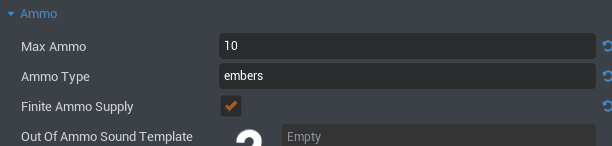
With the fire staff selected, scroll in the Properties window down to the Ammo section.
-
Check the box that says Finite Ammo Supply on.
-
Change the Max Ammo to 10.
-
Change the Ammo Type to "embers". This name will need to match the resource we create for our player to pick up.
Now we get to build the ammunition pickup itself.
-
-
We'll start by creating a
triggerobject for our player to interact with.Navigate to Core Content, and drag a
triggerobject from the Gameplay Objects section into your project Hierarchy. -
So now we have the object that handles the player running into it, but we need something for the player to actually see in-game.
This can be anything you want--for a Fire Staff, a spark-looking object could be cool.
- Choose whatever object you would like from Core Content, and drag it onto the
triggerin the Hierarchy. From there, edit it however you would like. - Right click this object and create a group containing this.
- Now that you have this group containing your ember shape, right click it and create a New Client Context Containing This. In general, you always want to keep art in client context or server context folders, to allow the game to run more smoothly.
- Choose whatever object you would like from Core Content, and drag it onto the
-
That settles the art portion--now for the script that will make the game magic happen.
-
Within your project content, create a new script and call it "EmberPickupScript".
-
Drag this script onto the
triggerwe made in your project Hierarchy.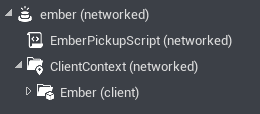
-
Open the script. The first thing we'll need is a reference to the trigger itself, so that we can access the events that it comes with. This line is very quick and simple since the script is a child of the trigger:
local trigger = script.parent -
Now we need a function that determines what to do when the player touches the trigger. We want it to add 1 unit of ammo to the player's resources, and then we want to destroy the ammo object so that they cannot keep picking up the same one.
We can do all these things in one function--use the code below to get this to happen.
function OnBeginOverlap(whichTrigger, other)
    if other then
        print(whichTrigger.name .. ": Begin Trigger Overlap with " .. other.name)
        other:AddResource("embers",1)
        print("Player has "..tostring(other:GetResource("embers")).." embers.")
        trigger:Destroy()
    end
end
Notice the
print()statements in the code--these help us by showing in the Event Log what is happening. So when we test this, open the Event Log window and check there for the statements showing the player's embers resource increasing. -
Lastly, we need to connect the function we just made to the trigger's built-in event for overlapping.
Add this code to the very bottom of your script:
trigger.beginOverlapEvent:Connect(OnBeginOverlap)
-
-
Once you've set up all the code, the final step is to select the trigger itself (that holds both the art and the script) and right click it. Select "Enable Networking" to enable this to work properly.
-
Test it out. Shoot the Fire Staff 10 times, and when you're out of ammo and cannot shoot anymore, pick up an ember pickup. Once you've gathered one, press R on the keyboard to trigger the reload ability. If all is set up correctly, that would give you 1 more fire bullet to fire.
Connecting UI
You'll probably want to set up User Interface (UI) for your fire staff's abilities. For a refresher on how to set this up, check out the Ability Tutorial's section on UI.
Examples
- Spellshock includes advanced abilities using ability objects.
- Core Content includes pre-made and ready-to-use weapons. Check in Game Components > Weapons to see what is available. Compare what we made here with "Advanced" weapons to see what is possible, and even more.
Learn More
Binding Sets | Ability API | Player API | Input API