Survival Tutorial
Item Systems Overview
The item systems in the Survival Jam Kit involves interlocking systems of creating the actually 3D shape of the items -- the World Geometry -- icons and data to represent those items in looting, inventory, and crafting menus, a crafting system to make items out of each other, and looting and scavenging systems that allow players to find them in the world.
Table of all Item Systems
| System | Definition |
|---|---|
| Item (Geometry) | Client context folder containing all the 3D objects that make up what this item should look like in the world. The client context also contains Custom Properties for the name, icon, and stack. These must be saved as templates, usually with the name ITEM_Type_Name. Example: ITEM_Misc_Cloth |
| Item (Registry) | In the ItemRegistry folder, this group has Custom Properties with the item name, icon, description and other properties indicating how it should behave in the Inventory. It also contains a reference to an Item, which is the Item Geometry template defined above. |
| Loot Table | Items that can be searched, and mob deaths that cause item drops choose the items randomly based on how rare they are. The items are randomly chosen from the groups in each section of the LootTables group. They have a Likelihood property that is the chance of finding them out of 100, and a reference to the item in the ItemRegistry part of the Hierarchy. |
| Recipes Registry | Ways to create combinations of items that will give players other registered items through the crafting system. Each group has a Custom Property for the Item Geometry, with the outermost group representing what players will get from combining the items, and groups inside representing the items that are needed, with a Custom Property on each for the required quantity. |
| Scavenge Node | A real-world space where players have a chance of finding a specific item. This has its own collection of 3D Object Geometry for how the item scavenge node should look that can be entirely different from the item itself. These do not require a reference to the Item Geometry or Item Registry, and instead can find the registered item just by matching the itemName property. |
Creating a New Crafting Material
In this example, we will make a new item that can be used to craft other items. You can follow the same instructions to make other item types, like Consumables or Weapons as well.
Duplicate an ITEM Template
Start by making the geometry (the 3D object) to represent your crafting material.
- In the Project Content window, search
ITEM_to find an example item in the Misc category, like ITEM_Misc_Bone - Drag a copy of a the template into the scene in the Hierarchy to edit.
- Change the Custom Properties to reflect your plans for the item:
- Name: The name used for your item across all the different systems.
- Icon the UI image that will show for this item in the inventory, crafting menu, and loot menus.
- MaxStackableSize is the most that player can have in one slot of their inventory.
- ItemType is the item's category. For a crafting ingredient, this should be
Misc. - Description is information about the item displayed to the player. It could be a clue for how this item is useful.
- Rarity is how unusual it is to find.
Info
All of the Rarity options can be found in Gameplay Systems > Item Systems > Item Rarities
Change the Geometry
In the Client Context folder of the ITEM_ template, change the 3D objects inside to represent your item. Right now it is unlikely that you will actually see this in game, because you cannot equip crafting materials.
Save the Template
Once the template's Custom Properties and Geometry reflect the way you want your new item to be, right click the template in the Hierarchy and select Create New Template From This.
Duplicate an Item Registry
The easiest way to create an item registry with all the necessary Custom Properties is to copy an existing one and change it to match your new item.
- In the Item Systems section of Gameplay Systems, open the RegisteredItems group.
- Open the folder for Crafting Materials, and select one of the groups inside, like Wood.
- Right click the Wood group and select Duplicate.
- Right click the duplicate Wood and select Rename, and give it a name to match the new material.
Tip
Use Ctrl+W to duplicate something in the Hierarchy, and F2 to rename it.
Copy Properties
The Custom Properties of the ITEM_ template are the same as in the Item Registry, so you can save time by copying and pasting the properties.
- Select your ITEM_ template in the Hierarchy, and open the Properties window.
- In the top right corner, press the Copy Properties button to copy the template's properties.
- Delete the ITEM_ template from the Hierarchy.
Paste Properties to the Item Registry
- Select the Item Registry for your new material in the Crafting Materials group or other appropriate item group.
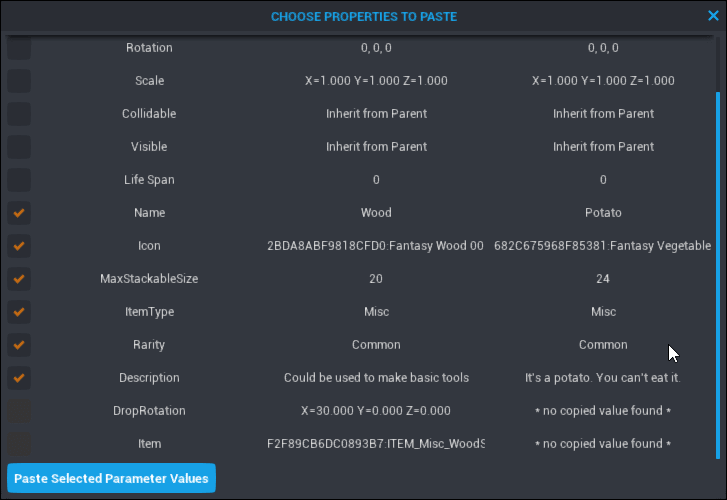
- In the Choose Properties to Paste menu, check the box for the last 6 selectable properties:
- Name
- Icon
- MaxStackableSize
- ItemType
- Rarity
- Description
- Press the Paste Selected Parameter Values button.
Add the Template Reference
The final step to registering your new material is to add the ITEM_ template reference to the Item Registry.
- Select the Item Registry again and open the Properties window.
- In Project Content, find the reference to your ITEM_ template.
- Click and drag the template reference into the Item property of the Item Registry.
Gathering a Crafting Material
You have now successfully created a new material for use in your game, but to test it there needs to be a way to actually get the material in the game. There are several built-in systems that spawn items into the world.
Creating a Scavenge Node
Scavenge nodes are an easy way to create an item pickup in your game. They are sorted by the areas of the base map in which they appear.
Duplicate a Scavenge Node
- In the Level Design folder of the Hierarchy, find folder with Scavenge in the name that is closest to your spawn point, most likely the Town Scavenge folder.
- Select one of the ScavengeNode- trigger groups and press F to move to its location in the world.
- Press Ctrl + W to duplicate the template, or right-click it in the Hierarchy and select Duplicate.
Customize the Scavenge Node
- Right-click the duplicate Scavenge Node and select Deinstance.
- Change the name of the trigger to match your item.
- Select the SCAVENGE_NodeScript script, and change the itemName property to the exact name of your item from the Item Registry.
- In the Client folder, open the Geometry group, and change the meshes inside to reflect an item that would indicate to players that they might find an item here.
- Right click the template and select Create New Template From This to use more of these scavenge nodes across the map.
Adding Items to Loot Tables
Loot tables will give players a random chance of finding your item when they defeat enemies or search Searchable Loots.
- In the Item Systems folder, open the ItemRegistry folder and then the LootTables folder.
- Choose on of the loot categories -- for example, MobTrash -- and select a loot table to duplicate (not Empty).
- Duplicate the LootTable entry with Ctrl + W and rename it to match the item.
- Change the Likelihood, MinimumStackWhenDropped and MaximumStackWhenDropped properties to reflect how easy or difficult it should be to find your item.
- Find the Item Registry for the item in the RegisteredItems folder, and drag this ObjectReference into the Item property of the LootTable entry.
- Duplicate this Loot Table object and drag the copy into any of the other loot tables.