Producers, Buffs and Areas Tutorial
Overview
The Producers, Buffs, and Areas Example Project allows creators to design games around producers which transform items into different items over time, buffs which provide customizable restrictions on the producers, and areas which allow the world space to be divided into distinct pieces which can be loaded on demand.
This tutorial will be breaking apart an example scene where the player can light a camp fire and cook fruit on the fire. This tutorial will make a similar Producer that can raise Alien Eggs to become Alien Raptors.
- Completion Time: ~2 hour
- Knowledge Level: No Lua scripting involved, but basic Core Editor knowledge is recommended.
- Skills you will learn:
- Creating Inventory Items
- Creating a Placeable Area
- Creating a Producer item
- Creating Placeable items
- Creating a Buff
- Using a 3D Icon Generator
Creating a New Producers, Buffs and Areas Project
Download from the CREATE Menu
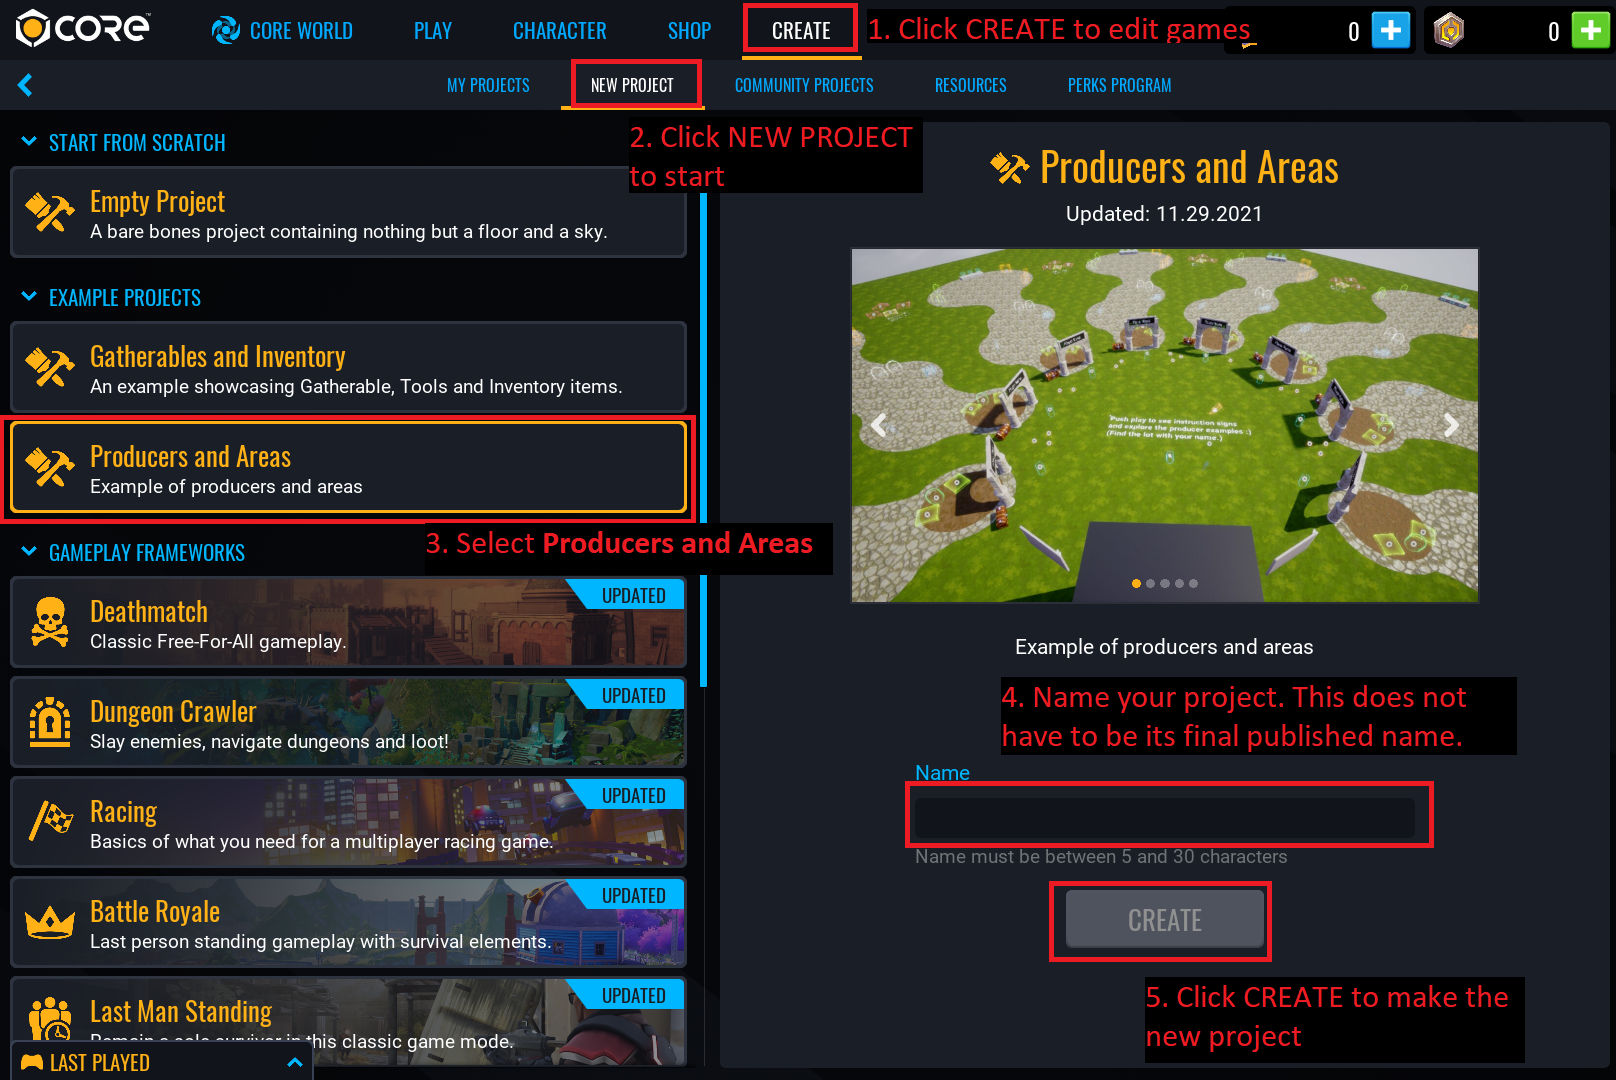
The Producers, Buffs and Areas Example Project can be found in the CREATE menu alongside the Empty and Framework project options.
- In Core, click the CREATE tab in the top menu bar to open options for new and existing projects.
- In the top menu bar of CREATE, select NEW PROJECT.
- In the EXAMPLE PROJECTS section, select Producers, Buffs and Areas.
- Give the project a name in the Name field and press the CREATE button.
Open the Basic Camp Fire Example
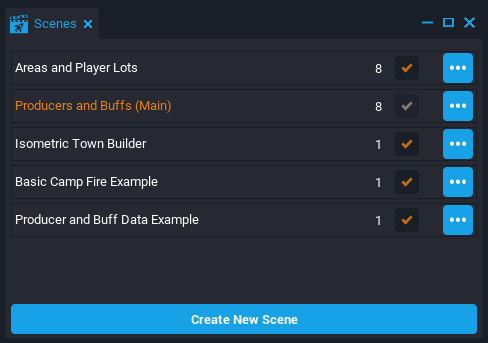
The project is divided into Scenes which showcase different ways the Producers, Buffs and Areas systems can be used to create gameplay. To access the Scenes window, click Window in the top menu bar and select Scenes. Double-click the Basic Camp Fire Example to the load the correct scene.
Test the Cooked Fruit System
The Basic Camp Fire Example scene has a working example where the player can cook fruit. This tutorial uses the cooking fruit example as a guide to make a similar system.
Press ++=++ or the Play ![]() button in the top toolbar to start a preview and test the scene.
button in the top toolbar to start a preview and test the scene.
Basic Controls
- The number keys to equip items in the Hotbar Inventory displayed at the bottom.
- I turns Inventory Mode on and off to equip or drop items with the mouse.
- The left mouse button to places or uses items.
Testing the Campfire
- Place a Campfire Ring item on the Dirt area and then place the Fire Spit item on top of it.
- Place Firewood into the campfire ring and light it with the Matches.
- Place the Red Fruit item onto the fire spit.
- Collect the Cooked Fruit and wait for the fire to burn out to collect Charcoal.
- Relight a new fire and place another fruit. This time do not collect until the fruit burns.
- Use the Hammer item to break down and collect placed items.
Warning
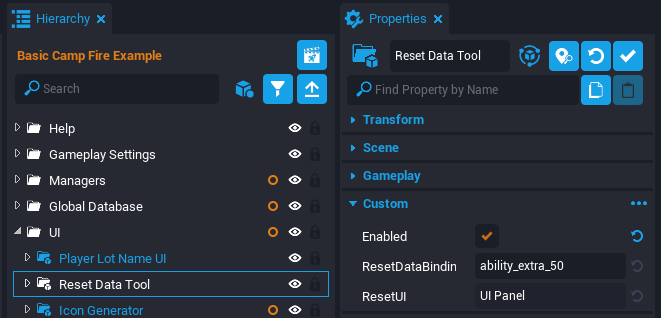
While in Preview Mode, players can press F1 to reset the Player's Data. This is a useful tool for testing new items or features in the game. However, this should be removed before publishing a game. Search Reset Data Tool in the Hierarchy and open the Properties window to disable the tool.
Creating a Scifi Placeable Area
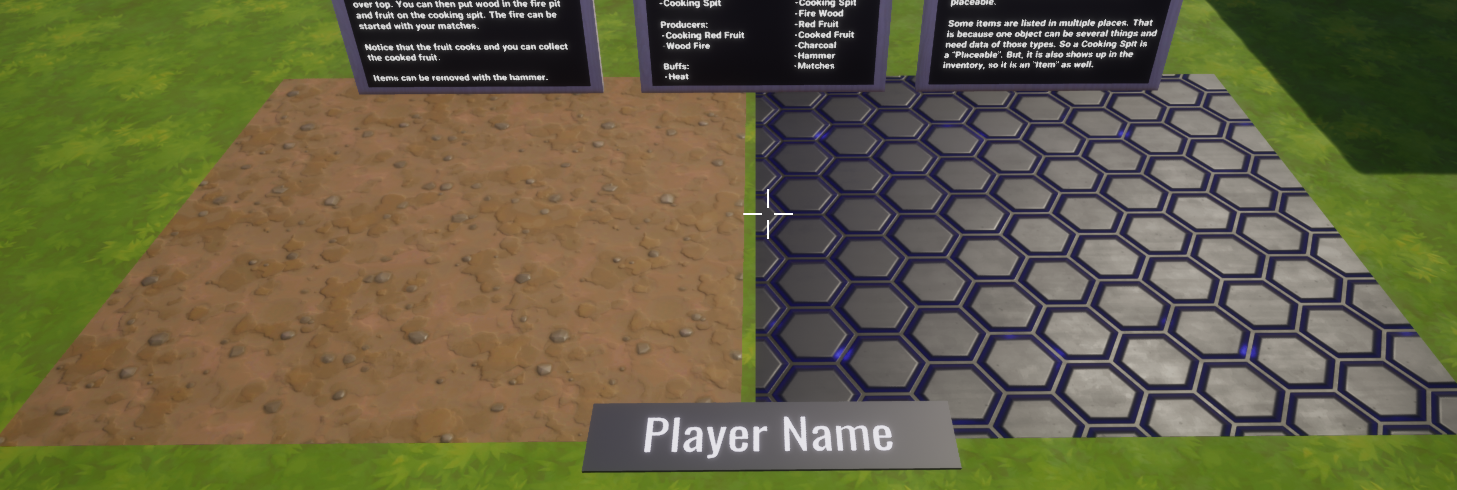
Currently there is a single Player Lot with a Dirt Placeable Area within it. This signifies where the player can place certain items and have it be saved between play sessions. There will be a new Scifi Placeable Area in the same Player Lot that will handle the Alien Raptor production.
Duplicate the Dirt Placeable Area
In the Hierarchy, expand the Player Lot group. Select the Dirt (Farmable Area) group and duplicate it using Ctrl+W. Press F2 or right-click the new Dirt (Farmable Area) and select Rename and change the name of the new group to Scifi (Incubating Area).

Modify the Scifi Area Properties
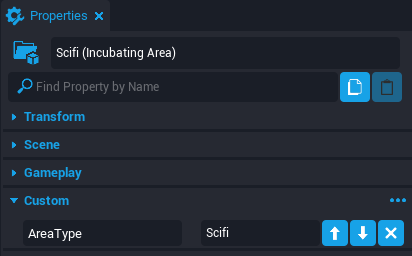
Select the Scifi (Incubating Area) group and open the Properties window. Set the custom AreaType property to Scifi.
Modify the Scifi Area Material
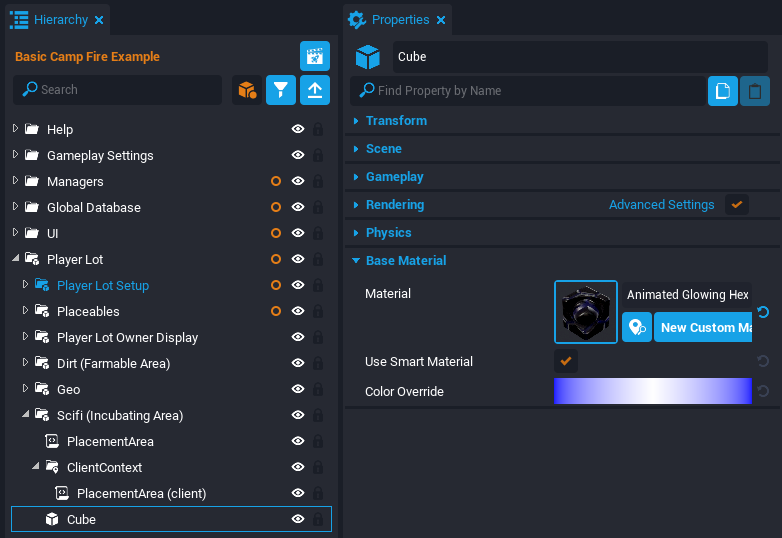
Inside the Scifi (Incubating Area) group, select the Cube object and open the Properties window. Set the Material property to Animated Glowing Hex.
Transform the Areas
The Dirt and Scifi areas are on top of each other. The cubes for each of these areas need to be resized and moved so they are both visible side by side.
- Select the Cube within the Scifi (Incubating Area) group.
- Activate Scale Mode by pressing R and decrease the width of the cube by half.
- Activate Translation Mode by pressing W and move the cube to the side.
- Select the Cube within the Dirt (Farmable Area) group.
- Activate Scale Mode by pressing R and decrease the width of the cube by half.
- Activate Translation Mode by pressing W and move the cube to the side.
Creating an Alien Egg
The Alien Egg is an item that will start in the player's inventory. It will need three templates of the visual geometry for how it looks in different places:
- Held in the player's hand
- Dropped to the floor
- In an inventory slot
The Red Fruit item already has these three templates. They all have the same art model but are transformed to the desired context (for example laying on the ground or placed in the player's hand).
Create the Art Model
The art model for the egg is a simple mesh shape with a material on it.
- Open the Core Content window and search for
Ovoid 01. - Drag and drop the mesh into the Hierarchy.
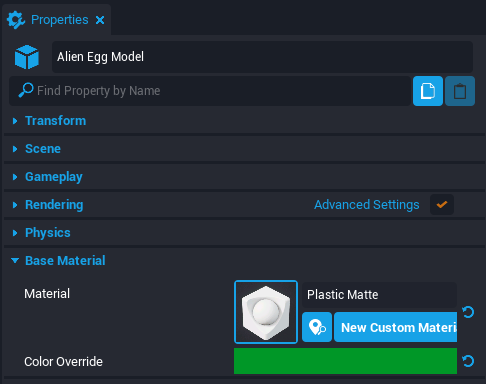
- Rename the mesh to
Alien Egg Model. - Select the mesh and open the Properties window.
- Set the Material property to
Plastic Matte. - Set the Color Override property to a green color.
Duplicate the Red Fruit Item
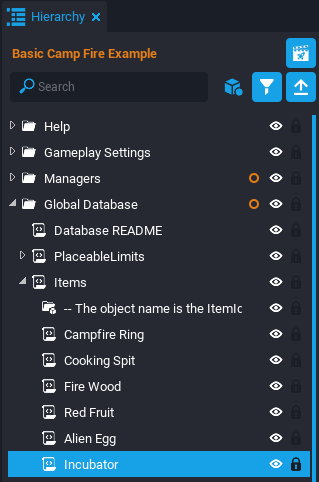
In the Hierarchy, open the Global Database folder and then expand the Items script. Any item that is placed in the inventory needs data in this group. Right click the Red Fruit script and select Duplicate. Rename the duplicated Red Fruit script to Alien Egg.
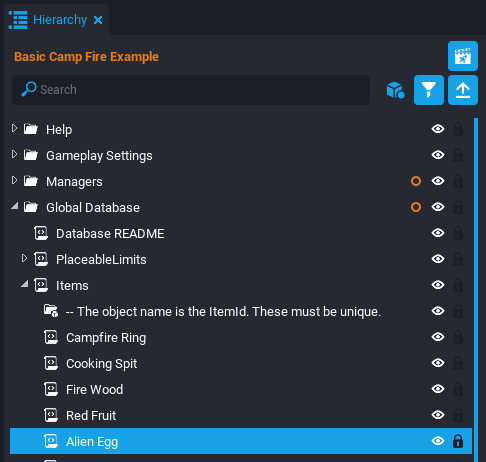
Examine the Alien Egg Properties
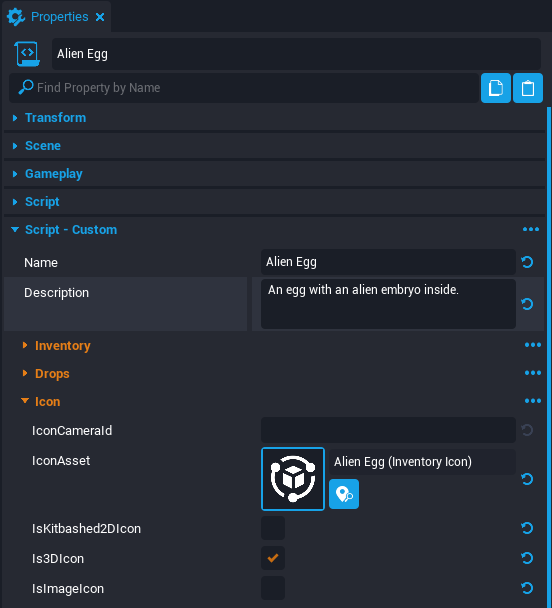
Select the Alien Egg and open the Properties window. There are many custom properties for each item.
| Property Name | Description |
|---|---|
| CanDrop | Activate if the Item can be dropped on the ground from the Inventory. |
| DropTemplate | The template that spawns on the ground when an Item is dropped from the Inventory. |
| IconAsset | The template that appears in the Inventory slot. Can be a Kitbashed 2D Icon, 3D Icon, or an Image Icon. |
| IsKitbashed2DIcon | Activate if IconAsset is a created from multiple images from UI Textures. |
| Is3DIcon | Activate if IconAsset is made from a 3D model. |
| IsImageIcon | Activate if IconAsset is a single image from UI Textures. |
| CanEquip | Activate if the player can hold and use the item by selecting it in the Inventory. |
| EquipmentVisualTemplate | The template spawned on the player when an item is equipped. |
Boolean Custom Properties
Properties with a checkbox [x] are Boolean type, which are true when checked and false when unchecked. Checking the box "activates" that property.
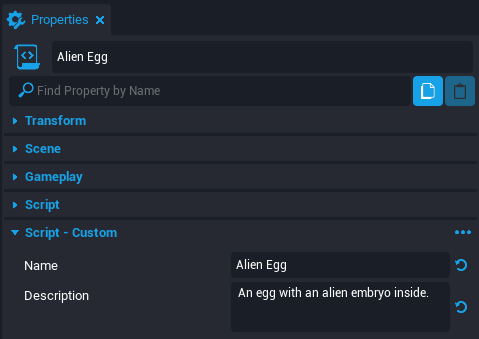
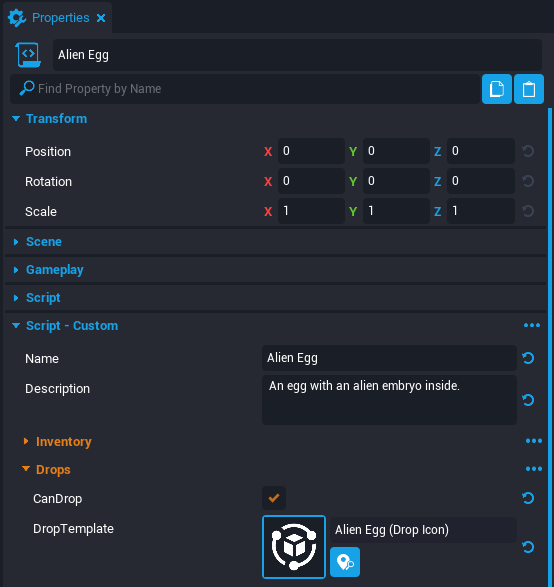
Change the Name and Description
Set the Name property to Alien Egg. Then set the Description property to An egg with an alien embryo inside..
Change the Drop Template
The DropTemplate property should already have a template from the Red Fruit item named Product - Fresh Red Fruit (Drop Icon). The template contains a Geo group with the mesh displaying the red fruit item on the ground.
- Click the Find in Asset Catalog button
 to the right of the DropTemplate property to open the Project Content window with the template selected.
 - Drag and drop the Product - Fresh Red Fruit (Drop Icon) template into the scene besides the Alien Egg Model.
- Right click the template and select Deinstance This Object. Right click the template again and select Abandon Template for Entire Instance.
- Right click the Alien Egg Model in the Hierarchy and select Duplicate.
- Drag and drop the duplicated Alien Egg Model into the Geo folder of the Product - Fresh Red Fruit (Drop Icon).
- Position the duplicated Alien Egg Model to be on top of the red fruit (Basic Pepper 02).
- Resize the duplicated Alien Egg Model to the desired in-game size.
- Delete the Basic Pepper 02 mesh from the Geo folder.
- Right click Product - Fresh Red Fruit (Drop Icon) and select Create New Template From This.
- Name the template
Alien Egg (Drop Icon). - Delete the Alien Egg (Drop Icon) template from the Hierarchy.
- Search the Hierarchy for the
Alien Eggscript and open the Properties window. - Set the DropTemplate property to Alien Egg (Drop Icon).
Change the Icon Asset
The Icon Asset template has three different options to display an inventory icon. The option used for the red fruit template requires knowledge of the Icon Generator.
The Icon Generator
The Icon Generator is a component used to render 3D icons. It uses a remote camera in a black box to capture an image of a template. The black box should be moved in a published project to a place out of sight. To learn more about how icons are generated from 3D templates, see the Icon Generator Tutorial.
Duplicate the Icon Asset
The template for the Icon Asset is usually a particular size to get a clear capture on the camera. This is why using the red fruit's Icon Asset template as a base will make the process easier.
- Open the Project Content window and search for
Product - Fresh Red Fruit (Inventory Icon). - Drag and drop the Product - Fresh Red Fruit (Inventory Icon) template into the scene besides the Alien Egg Model.
- Right click the Product - Fresh Red Fruit (Inventory Icon) and select Deinstance This Object. Right click the template again and select Abandon Template for Entire Instance.
- Right click the Alien Egg Model in the Hierarchy and select Duplicate.
- Drag and drop the duplicated Alien Egg Model into the Geo folder of the Product - Fresh Red Fruit (Inventory Icon).
- Position the duplicated Alien Egg Model to be on top of the red fruit (Basic Pepper 02).
- Resize the duplicated Alien Egg Model to match the red fruit.
- Delete the Basic Pepper 02 mesh from the Geo folder.
- Right click Product - Fresh Red Fruit (Inventory Icon) and select Create New Template From This.
- Name the template
Alien Egg (Inventory Icon). - Delete the Alien Egg (Inventory Icon) template from the Hierarchy.
- Search the Hierarchy for the
Alien Eggscript and open the Properties window. - Set the IconAsset property to Alien Egg (Inventory Icon).
Visualize the Icon
As long as the Alien Egg (Inventory Icon) matched the red fruit Icon Asset template, then it will most likely produce a clear inventory icon. However, it is good to know how the Icon Generator is placing the template in front of the capturing camera in case adjustments are needed.
- In the Hierarchy, expand the UI folder and right click the Icon Generator and select Deinstance This Object. Right click the template again and select Abandon Template for Entire Instance.
- Inside the Icon Generator, expand the ClientContent group and find the Icon Container group.
- Open the Project Content window and search for
Alien Egg (Inventory Icon). - Drag and drop the template into the Icon Container group in the Hierarchy.
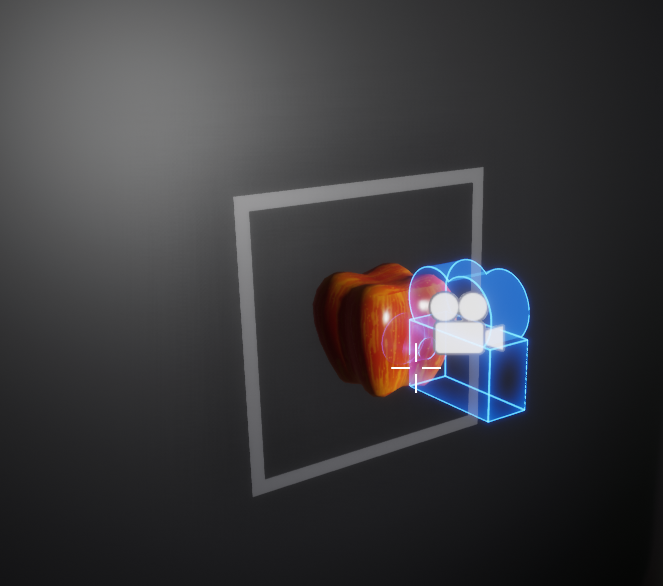
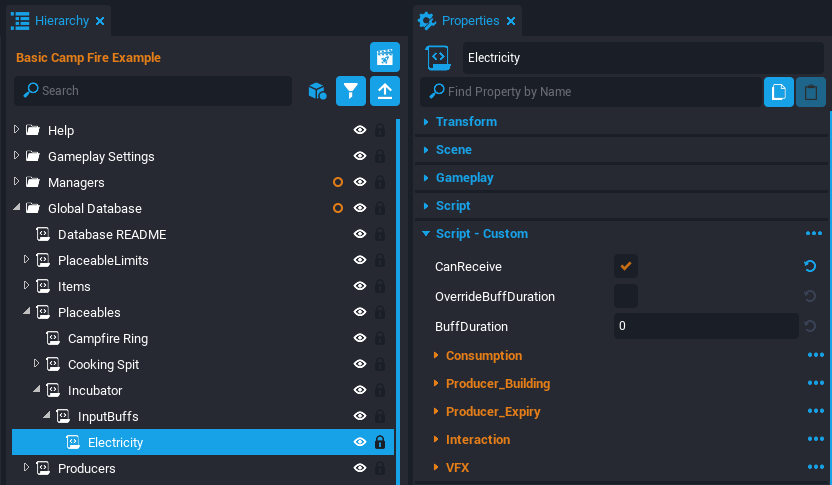
- Select the Alien Egg (Inventory Icon) and press F to focus the editor camera on it. The model should be centered and contained inside a gray box indicating the capture frame.
- If necessary, adjust the Alien Egg Model and update the Alien Egg (Inventory Icon) template.
- Delete the Alien Egg (Inventory Icon) template from the Hierarchy.
![]()
Change the Equipment Visual Template
The Equipment Visual Template is the attached player equipment if an item is selected. The red fruit's equipment has a specific position and rotation to fit in the player's hand.
- Click the Find in Asset Catalog button to the right of the EquipmentVisualTemplate property to open the Project Content window with the template selected.
- Drag and drop the Product - Fresh Red Fruit (Held) template into the scene besides the Alien Egg Model.
- Right click the template and select Deinstance This Object. Right click the template again and select Abandon Template for Entire Instance.
- Right click the Alien Egg Model in the Hierarchy and select Duplicate.
- Drag and drop the duplicated Alien Egg Model into the Geo folder of the Product - Fresh Red Fruit (Held).
- Position the duplicated Alien Egg Model to be on top of the red fruit (Basic Pepper 02).
- Resize the duplicated Alien Egg Model to the desired in-game size.
- Delete the Basic Pepper 02 mesh from the Geo folder.
- Right click Product - Fresh Red Fruit (Held) and select Create New Template From This.
- Name the template
Alien Egg (Held). - Delete the Alien Egg (Held) template from the Hierarchy.
- Search the Hierarchy for the
Alien Eggscript and open the Properties window. - Set the EquipmentVisualTemplate property to Alien Egg (Held).

Starting with an Alien Egg
The Alien Egg item is ready to be tested, but there's currently no way to access it in game. The player should start with an Alien Egg in their Hotbar Inventory.
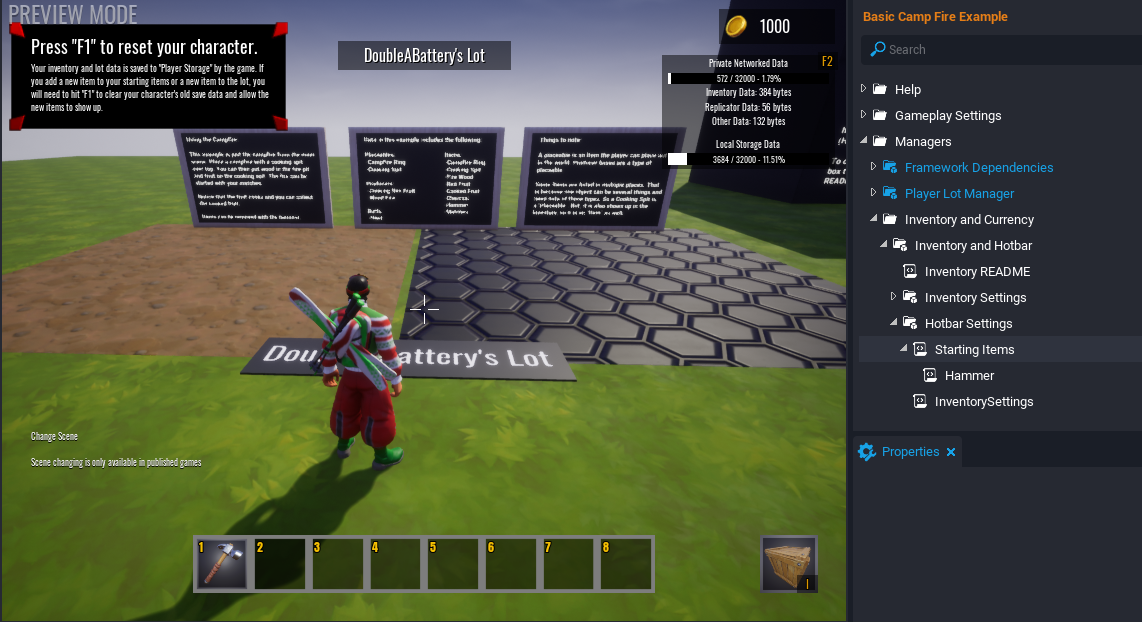
Remove the Starting Items
The starting items in the Hotbar Inventory are located in Hierarchy. They should be removed to make room for new items, except the Hammer which will be used to remove placeable items.
- In the Hierarchy, open the Managers folder.
- Open the Inventory and Currency folder.
- Open the Hotbar Settings group.
- Expand the Starting Items script to see all the starting items data.
- Delete all items except the Hammer.
- Preview the game and press F1 to reset the player data.
Starting items will not change until the player data is reset.
Add the Alien Egg to Hotbar
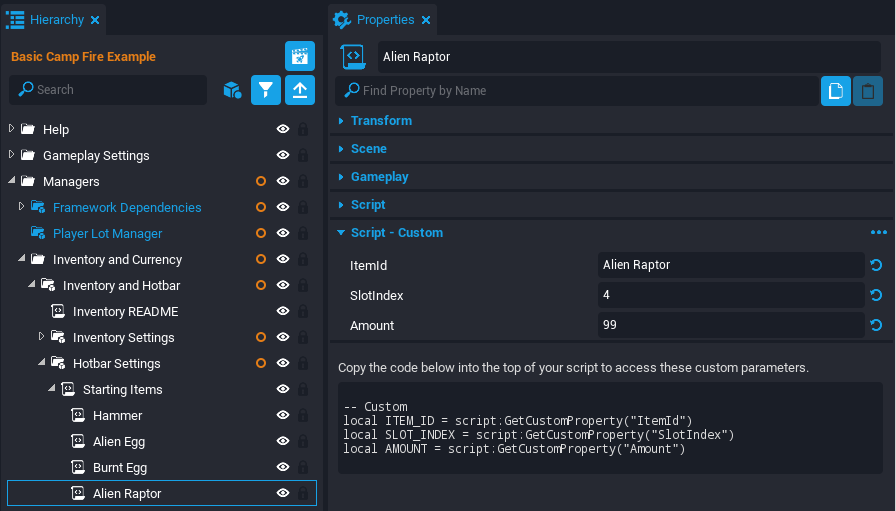
There is a script called StartingItemData in the project that can add a new starting item to the Hotbar Inventory.
- Search the Project Content for a script named
StartingItemData. - Drag and drop into the Starting Items script parent in the Hotbar Settings group.
- Rename the script to
Alien Egg. - Open the Properties window.
- Set the ItemId property to
Alien Egg. - Set the SlotIndex property to
2. - Set the Amount property to
99. - Preview the game and press F1 to reset the player data.
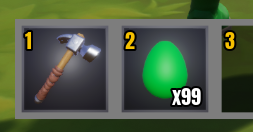
Test the Alien Egg Templates
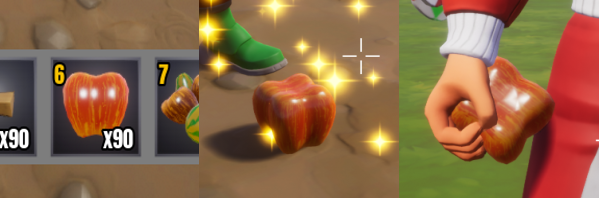
Now that the Alien Egg is in Hotbar Inventory, test the three templates:
- Alien Egg (Inventory Icon) should be visible in the Hotbar Inventory near the bottom of the screen.
- Alien Egg (Held) should be on the player's hand when selected in the inventory.
- Alien Egg (Drop Icon) appears when the player drags the item outside the inventory (Press I to enter Inventory Mode).
Tip
If any of the templates seem out of place (wrong position or scale), then drag the template into the scene. Make any changes necessary and update the template. Also, be sure to press F1 while playing to reset the player data and update those changes.
Creating a Burnt Egg
The next item is a Burnt Egg which is produced if an Alien Egg is incubated for too long.
Create the Item Templates
The Burnt Egg will need 3 templates for the drop object, inventory icon, and held object. The Alien Egg templates can be used with some slight modifications.
Drop Object
- Search the Project Content for
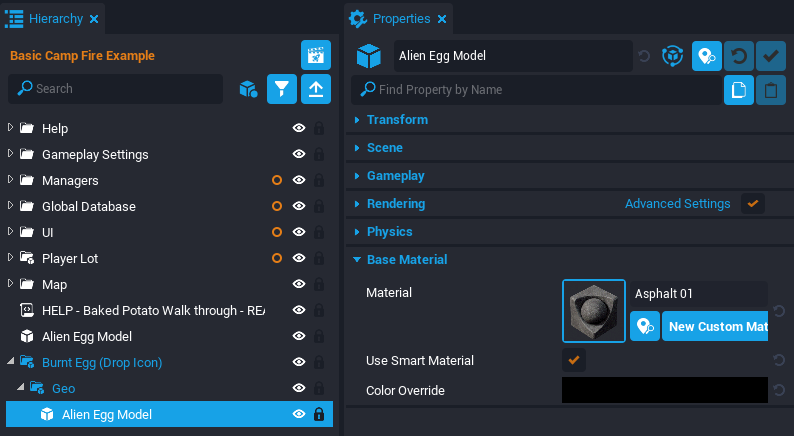
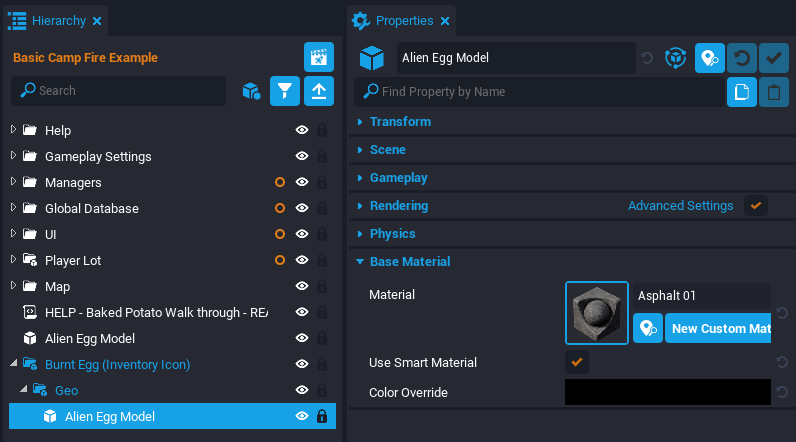
Alien Egg (Drop Icon)and place it into the scene. - Select the Alien Egg Model child and open the Properties window.
- Set the Material property to
Asphalt 01. - Set the Color Override property to black.
- Right click the Alien Egg (Drop Icon) template and select Create New Template From This.
- Rename the template to
Burnt Egg (Drop Icon). - Delete the Burnt Egg (Drop Icon) template from Hierarchy.
Inventory Icon
- Search the Project Content for
Alien Egg (Inventory Icon)and place it into the scene. - Select the Alien Egg Model child and open the Properties window.
- Set the Material property to
Asphalt 01. - Set the Color Override property to black.
- Right click the Alien Egg (Inventory Icon) template and select Create New Template From This.
- Rename the template to
Burnt Egg (Inventory Icon). - Delete the Burnt Egg (Inventory Icon) template from Hierarchy.
Held Object
- Search the Project Content for
Alien Egg (Held)and place it into the scene. - Select the Alien Egg Model child and open the Properties window.
- Set the Material property to
Asphalt 01. - Set the Color Override property to black.
- Right click the Alien Egg (Held) template and select Create New Template From This.
- Rename the template to
Burnt Egg (Held). - Delete the Burnt Egg (Held) template from Hierarchy.

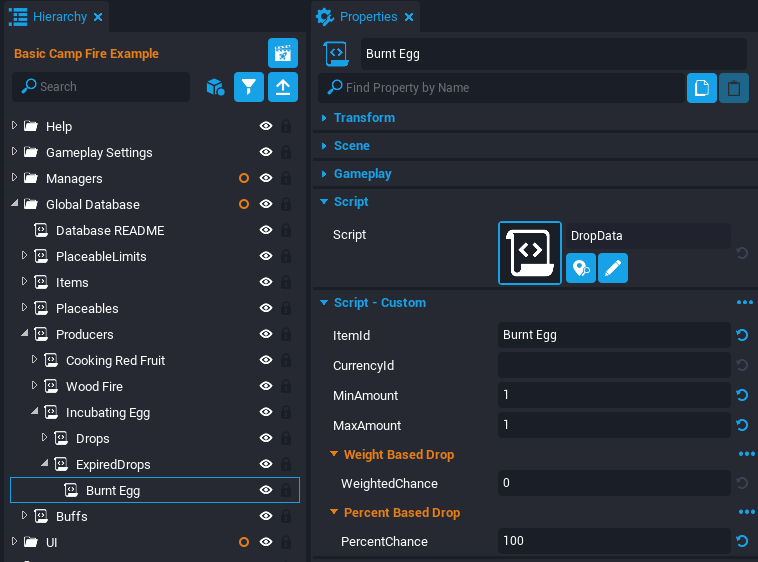
Create the Item Data
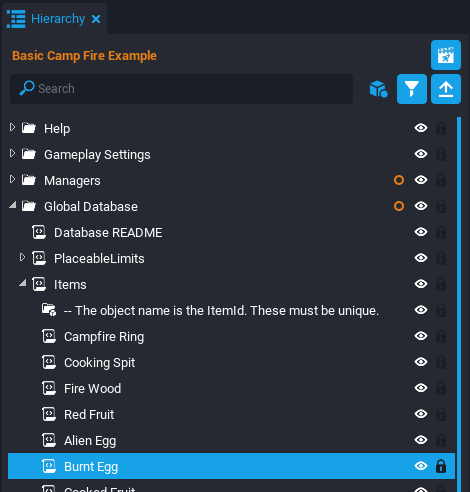
In the Hierarchy, open the Global Database folder and expand the Items script. Right click the Alien Egg script and select Duplicate. Rename the duplicated script to Burnt Egg.
Set the Item Properties
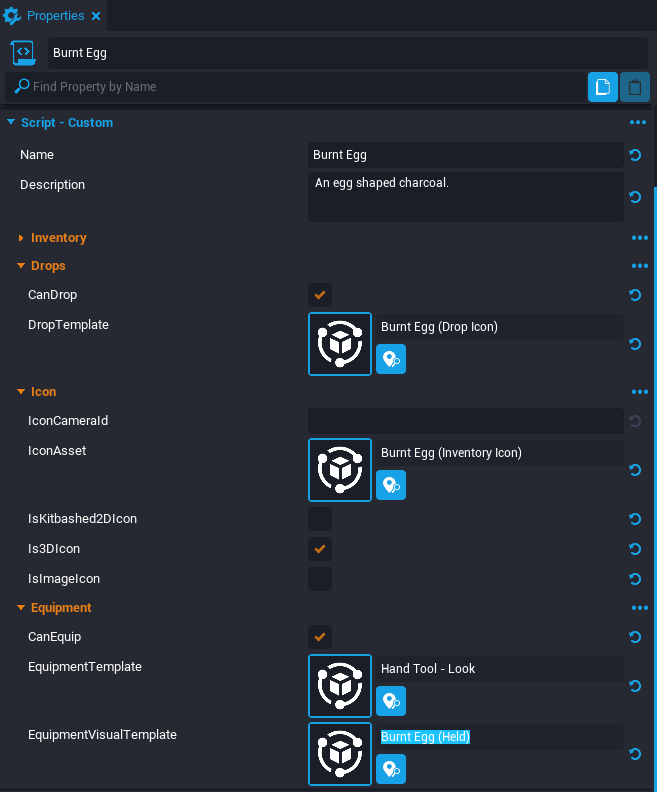
- Select the Burnt Egg script and open the Properties window.
- Set the Name property to
Burnt Egg. - Set the Description property to
An egg shaped charcoal. - Set the DropTemplate property to
Burnt Egg (Drop Icon). - Set the IconAsset property to
Burnt Egg (Inventory Icon). - Set the EquipmentVisualTemplate property to
Burnt Egg (Held).
Add to Starting Items
The fastest way to test the Burnt Egg item is to add it as a starting item in the Hotbar Inventory.
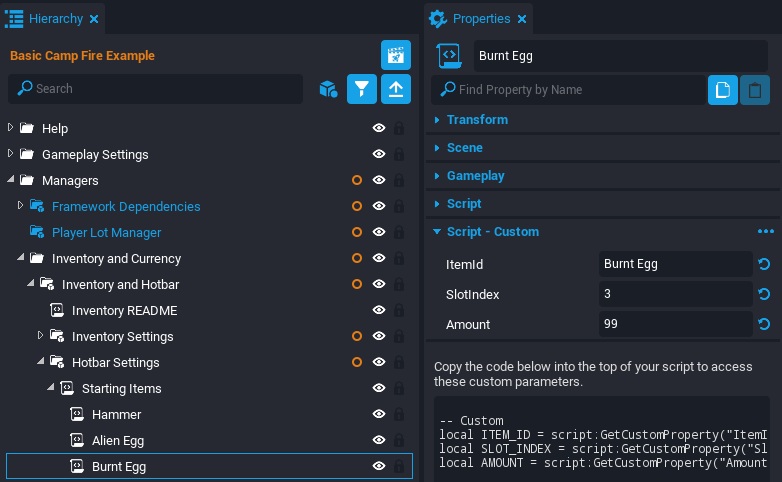
- In the Hierarchy, search for the
Starting Itemsscript under the Hotbar Settings group. - Right click the Alien Egg script and select Duplicate.
- Rename the duplicated script to
Burnt Egg. - Select the Burnt Egg script and open the Properties window.
- Set the ItemId property to
Burnt Egg. - Set the SlotIndex property to
3.
Test the Burnt Egg
Preview the project with ++=++ and press F1 to reset the player data. Check that all three templates (Drop, Inventory, and Held) are showing up and positioned correctly.
Creating an Alien Raptor
The Alien Raptor item is produced if the Alien Egg is incubated for the right amount of time.
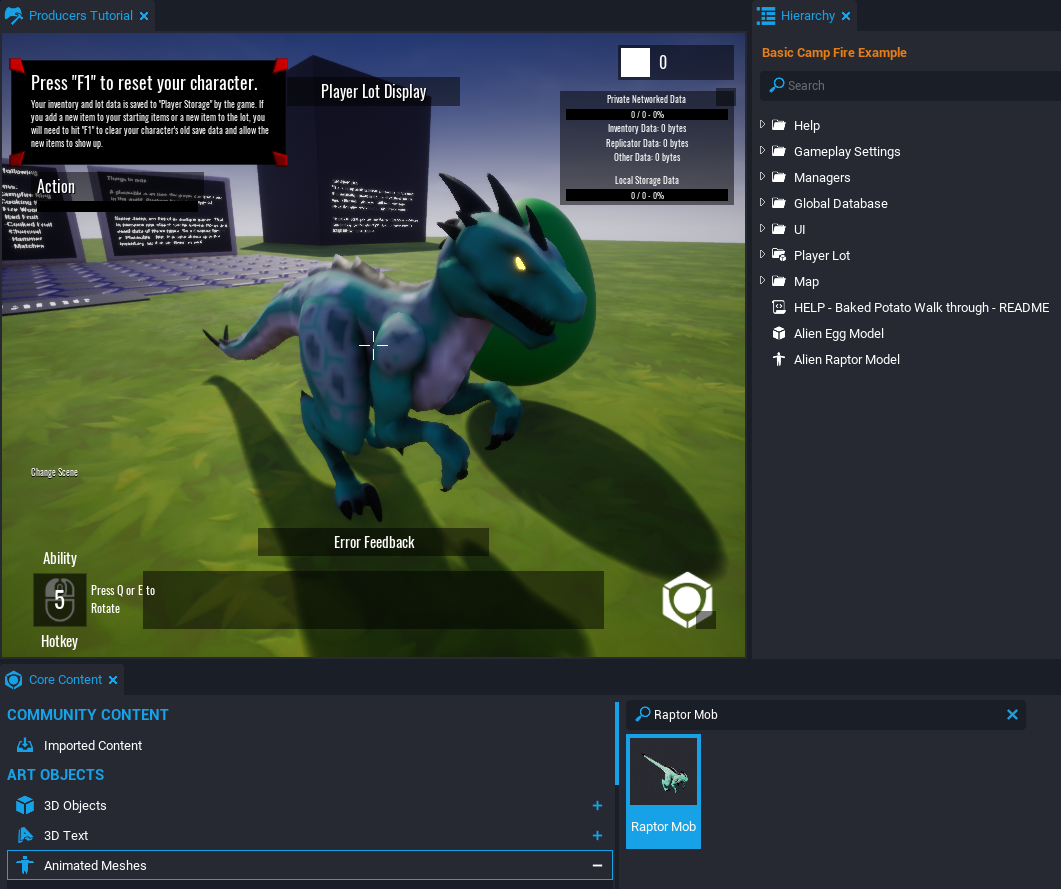
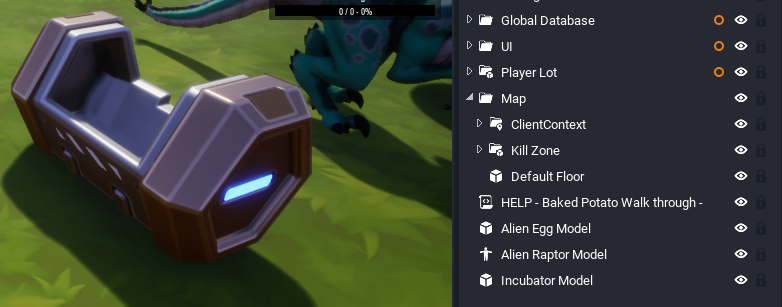
Create the Art Model
Search Core Content for the Raptor Mob animated mesh. Drag and drop the mesh into the scene. Rename the mesh to Alien Raptor Model.
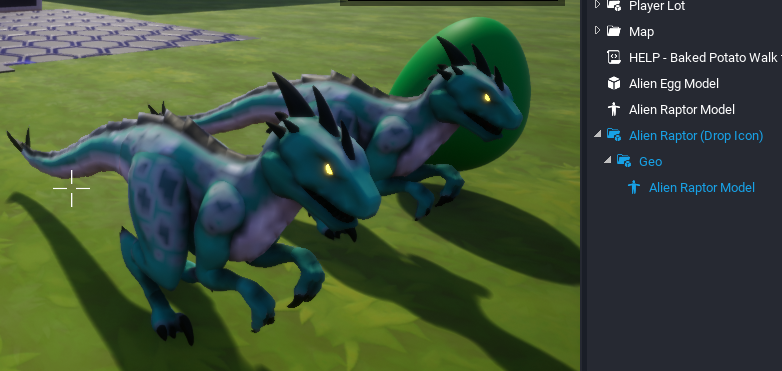
Create a Drop Template
- Search Project Content for
Burnt Egg (Drop Icon)template. - Drag and drop the Burnt Egg (Drop Icon) template into the scene besides the Alien Raptor Model.
- Right click the template and select Deinstance This Object. Right click the template again and select Abandon Template for Entire Instance.
- Right click the Alien Raptor Model in the Hierarchy and select Duplicate.
- Drag and drop the duplicated Alien Raptor Model into the Geo folder of the Burnt Egg (Drop Icon).
- Position the duplicated Alien Raptor Model to be on top of the burnt egg mesh.
- Resize the duplicated Alien Egg Model to the desired in-game size.
- Delete the Alien Egg Model mesh from the Geo folder.
- Right click Burnt Egg (Drop Icon) and select Create New Template From This.
- Name the template
Alien Raptor (Drop Icon). - Delete the Alien Raptor (Drop Icon) template from the Hierarchy.
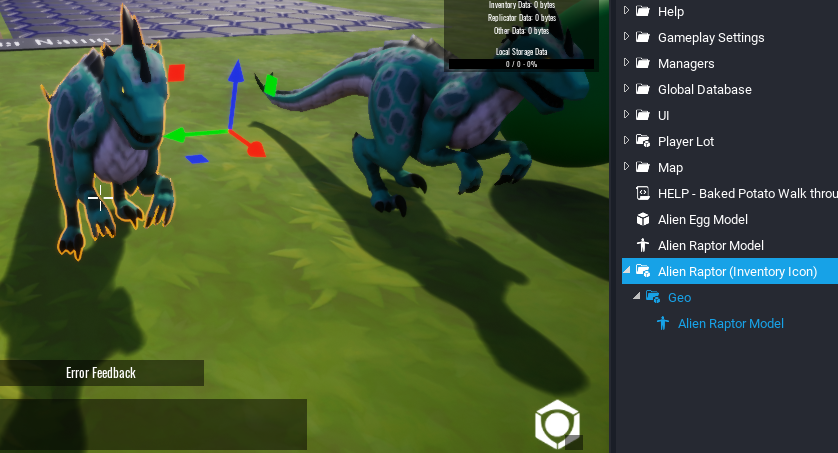
Create an Inventory Icon
- Open the Project Content window and search for
Burnt Egg (Inventory Icon). - Drag and drop the Burnt Egg (Inventory Icon) template into the scene besides the Alien Raptor Model.
- Right click the Burnt Egg (Inventory Icon) and select Deinstance This Object. Right click the template again and select Abandon Template for Entire Instance.
- Right click the Alien Raptor Model in the Hierarchy and select Duplicate.
- Drag and drop the duplicated Alien Raptor Model into the Geo folder of the Burnt Egg (Inventory Icon).
- Position the duplicated Alien Raptor Model to be on top of the burnt egg.
- Resize the duplicated Alien Raptor Model to match the burnt egg.
- Delete the Alien Egg Model mesh from the Geo folder.
- Right click Burnt Egg (Inventory Icon) and select Create New Template From This.
- Name the template
Alien Raptor (Inventory Icon). - Delete the Alien Raptor (Inventory Icon) template from the Hierarchy.
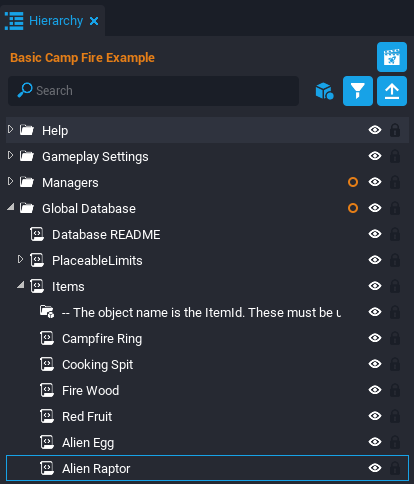
Create the Item Data
In the Hierarchy, open the Global Database folder and expand the Items script. Right click the Alien Egg script and select Duplicate. Rename the duplicated script to Alien Raptor.
Set the Item Properties
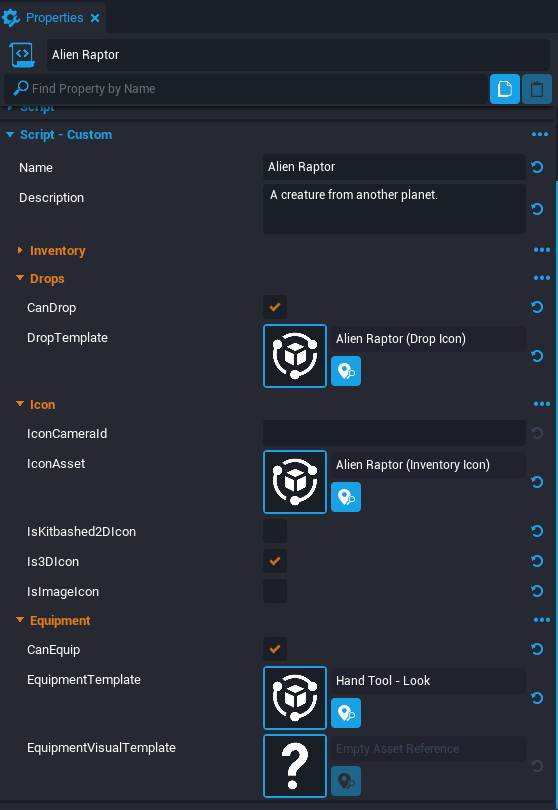
The Alien Raptor is not equippable so an equipment template is not needed.
- Select the Alien Raptor script and open the Properties window.
- Set the Name property to
Alien Raptor. - Set the Description property to
A creature from another planet.. - Set the DropTemplate property to
Alien Raptor (Drop Icon). - Set the IconAsset property to
Alien Raptor (Inventory Icon). - Set the EquipmentVisualTemplate property to Empty Asset Reference by pressing the Revert to Default button on the far right
 .
.
Add to Starting Items
- In the Hierarchy, search for the
Starting Itemsscript under the Hotbar Settings group. - Right click the Alien Egg script and select Duplicate.
- Rename the duplicated script to
Alien Raptor. - Select the Alien Raptor script and open the Properties window.
- Set the ItemId property to
Alien Raptor. - Set the SlotIndex property to
4.
Test the Alien Raptor
Preview the project and make sure to press F1 to reset the player data.
Creating an Incubator
The Incubator item serves as Producer Base for the Alien Egg to become the Alien Raptor.
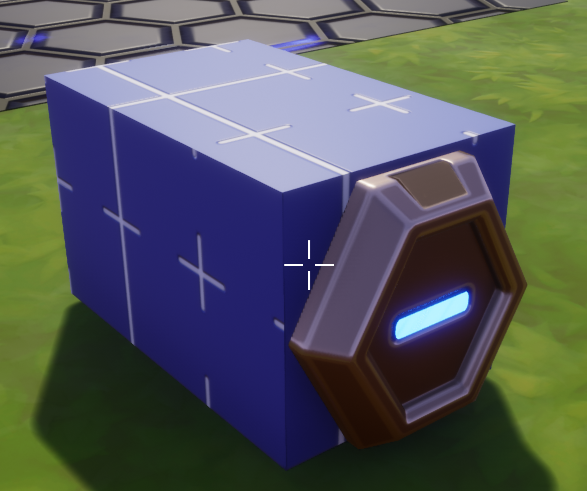
Create an Art Model
Search Core Content for Sci-fi Chest Common Base 01 mesh. Place the mesh into the scene and rename it to Incubator Model.
Create a Drop Template
- Search Project Content for
Burnt Egg (Drop Icon)template. - Drag and drop the Burnt Egg (Drop Icon) template into the scene besides the Incubator Model.
- Right click the template and select Deinstance This Object. Right click the template again and select Abandon Template for Entire Instance.
- Right click the Incubator Model in the Hierarchy and select Duplicate.
- Drag and drop the duplicated Incubator Model into the Geo folder of the Burnt Egg (Drop Icon).
- Position the duplicated Incubator Model to be on top of the burnt egg mesh.
- Resize the duplicated Incubator Model to the desired in-game size.
- Delete the Alien Egg Model mesh from the Geo folder.
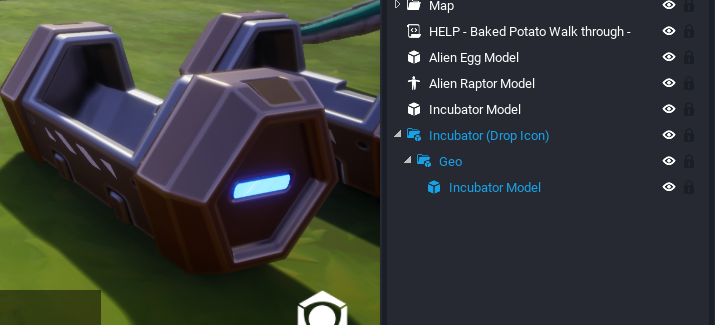
- Right click Burnt Egg (Drop Icon) and select Create New Template From This.
- Name the template
Incubator (Drop Icon). - Delete the Incubator (Drop Icon) template from the Hierarchy.
Create the Item Data
In the Hierarchy, open the Global Database folder and expand the Items script. Right click the Alien Egg script and select Duplicate. Rename the duplicated script to Incubator.
Set the Item Properties
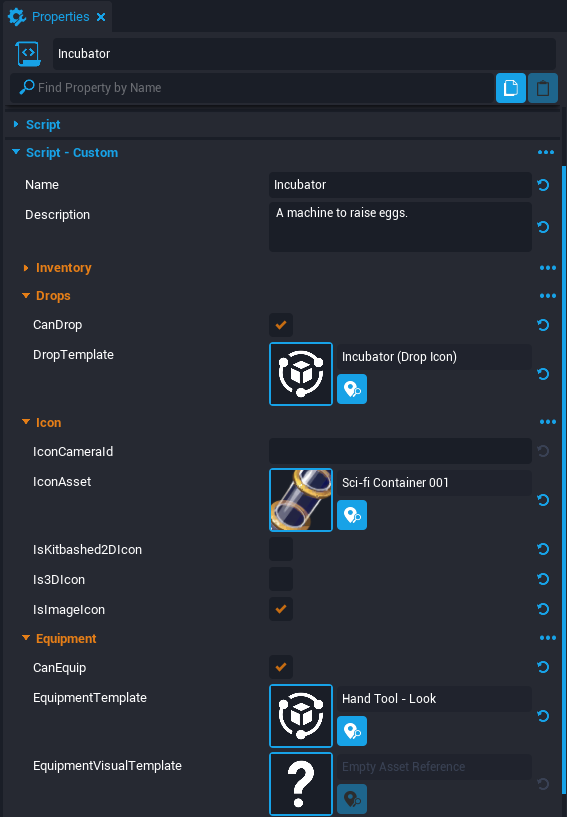
The Incubator item will use a 2D Image instead of a 3D Icon for the Inventory Icon.
- Select the Incubator script and open the Properties window.
- Set the Name property to
Incubator. - Set the Description property to
A machine to raise eggs.. - Set the DropTemplate property to
Incubator (Drop Icon). - Set the IconAsset property to
Sci-fi Container 001. - Set the Is3DIcon property to inactive.
- Set the IsImageIcon property to active.
- Set the EquipmentVisualTemplate property to Empty Asset Reference by pressing the Revert to Default button on the far right .
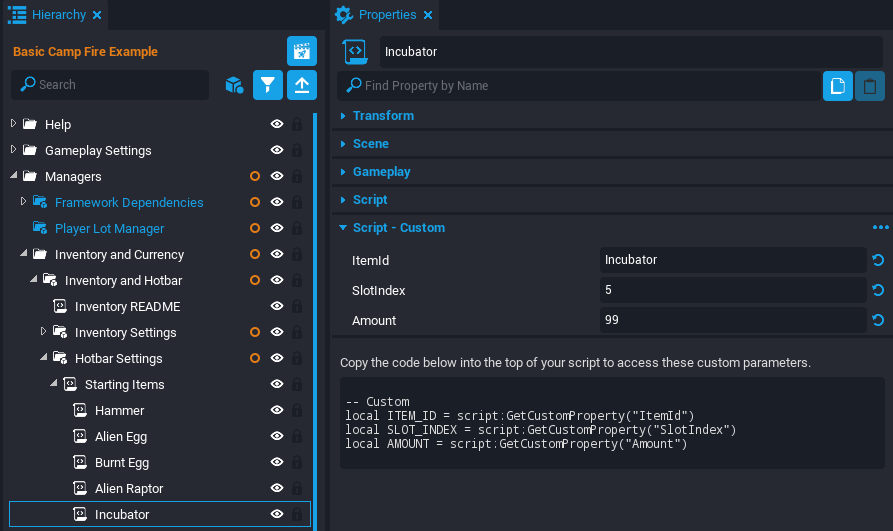
Add to Starting Items
- In the Hierarchy, search for the
Starting Itemsscript under the Hotbar Settings group. - Right click the Alien Egg script and select Duplicate.
- Rename the duplicated script to
Incubator. - Select the Incubator script and open the Properties window.
- Set the ItemId property to
Incubator. - Set the SlotIndex property to
5.
Test the Incubator
Preview the project and make sure to press F1 to reset the player data.
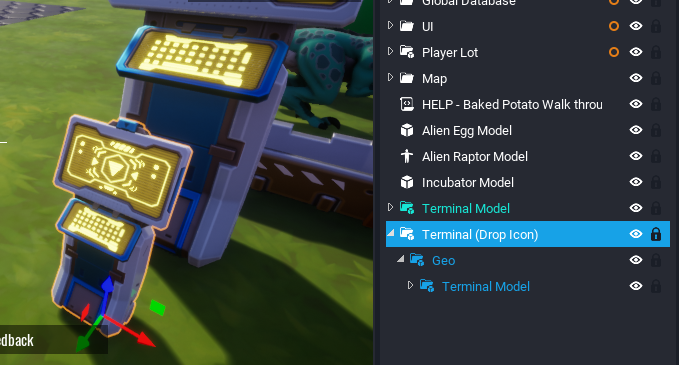
Creating a Terminal
The Terminal item outputs an Electricity Buff that powers nearby Incubators.
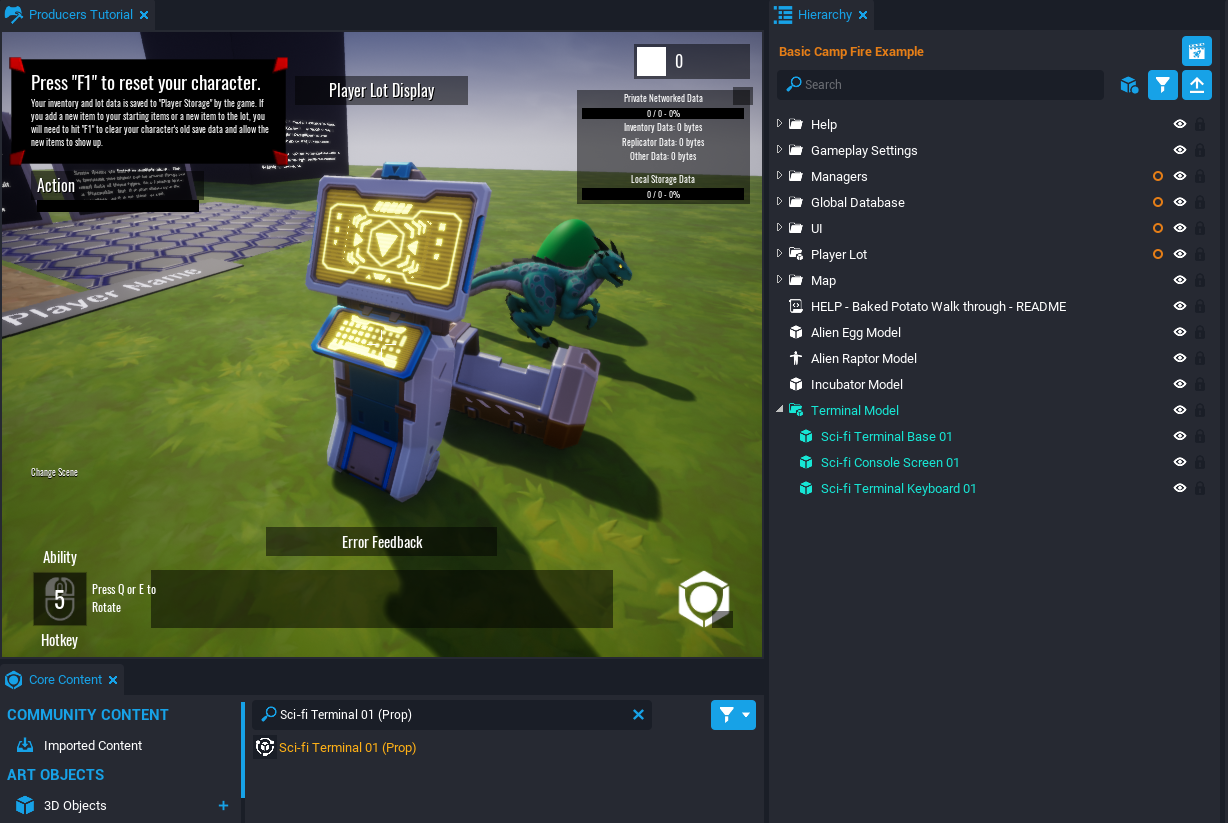
Create an Art Model
Search Core Content for Sci-fi Terminal 01 (Prop) template. Place the template into the scene and rename it to Terminal Model. Right click the Terminal Model and select Deinstance This Object. Right click the template again and select Abandon Template for Entire Instance.
Create a Drop Template
The Drop Template for the Terminal item should be scaled smaller than the expected in-game size of a placed Terminal. This is because there is a world UI indicating to press F to pickup a dropped item, but it can be covered up by a large Drop Template.
- Search Project Content for
Burnt Egg (Drop Icon)template. - Drag and drop the Burnt Egg (Drop Icon) template into the scene besides the Terminal Model.
- Right click the template and select Deinstance This Object. Right click the template again and select Abandon Template for Entire Instance.
- Right click the Terminal Model in the Hierarchy and select Duplicate.
- Drag and drop the duplicated Terminal Model into the Geo folder of the Burnt Egg (Drop Icon).
- Position the duplicated Terminal Model to be on top of the burnt egg mesh.
- Resize the duplicated Terminal Model to be smaller than the desired in-game size.
- Delete the Alien Egg Model mesh from the Geo folder.
- Right click Burnt Egg (Drop Icon) and select Create New Template From This.
- Name the template
Terminal (Drop Icon). - Delete the Terminal (Drop Icon) template from the Hierarchy.
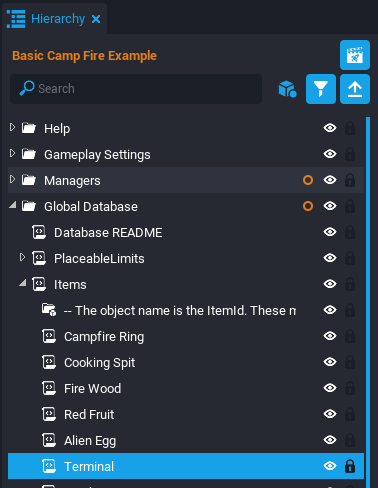
Create the Item Data
In the Hierarchy, open the Global Database folder and expand the Items script. Right click the Alien Egg script and select Duplicate. Rename the duplicated script to Terminal.
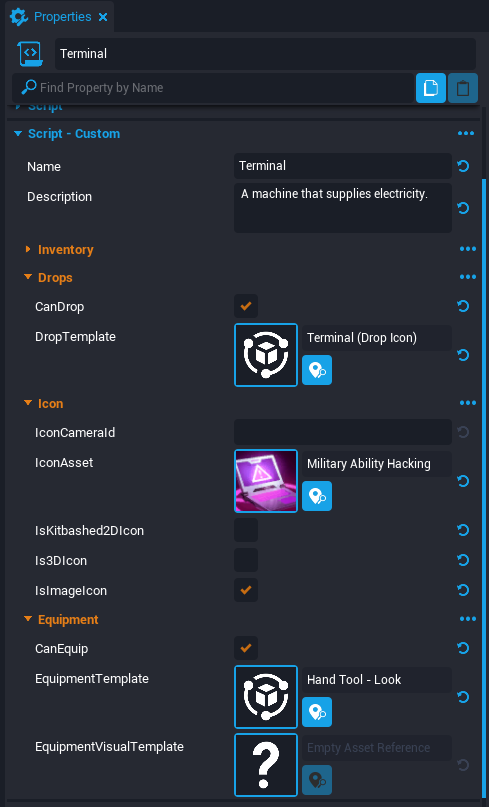
Set the Item Properties
- Select the Terminal script and open the Properties window.
- Set the Name property to
Terminal. - Set the Description property to
A machine that supplies electricity.. - Set the DropTemplate property to
Terminal (Drop Icon). - Set the IconAsset property to
Military Ability Hacking. - Set the Is3DIcon to inactive.
- Set the IsImageIcon to active.
- Set the EquipmentVisualTemplate property to Empty Asset Reference by pressing the Revert to Default button on the far right .
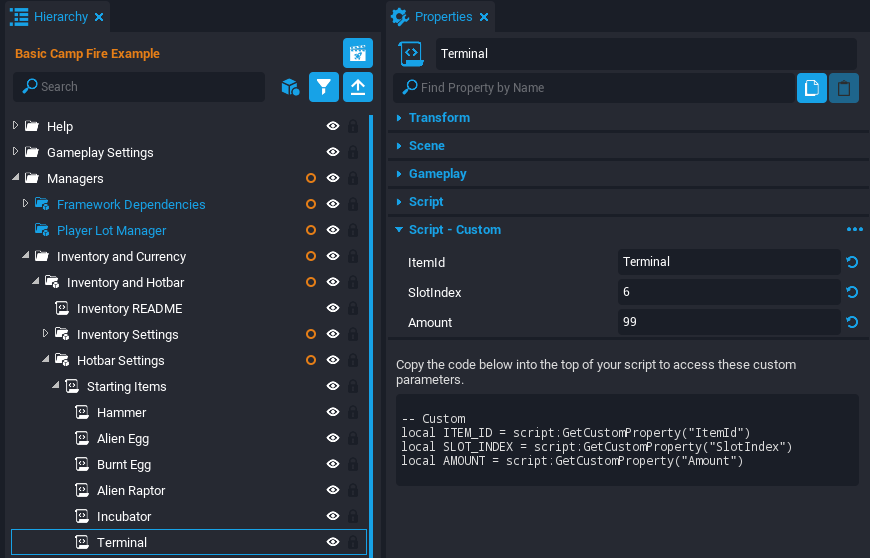
Add to Starting Items
- In the Hierarchy, search for the
Starting Itemsscript under the Hotbar Settings group. - Right click the Alien Egg script and select Duplicate.
- Rename the duplicated script to
Terminal. - Select the Terminal script and open the Properties window.
- Set the ItemId property to
Terminal. - Set the SlotIndex property to
6.
Test the Terminal
Preview the project and make sure to press F1 to reset the player data.
Creating an Electricity Buff
A Buff is an area based restriction on producers. For this example, the Terminal outputs an Electricity Buff that powers nearby Incubators to grow eggs.
Buff Properties
These are the properties for modifying a buff:
| Property Name | Description |
|---|---|
| Name | The name of the buff that will appear in some tooltips. |
| UniqueStorage | Used for storage and networking. Must be a unique number for each buff. |
| Duration | How long a buff will last on a target. A duration of 0 means the buff will be removed instantly. |
| Permanent | Activate for the buff to last forever or until something removes it. |
| MaxStacks | The max amount of buffs that can multiply the buff duration on a target. |
Create a New Buff
The Electricity Buff will be similar to the Heat Buff in the cooking fruit example. It does not require a lasting buff duration for the target item.
- In the Hierarchy, open the Global Database folder and then expand the Buffs script.
- Right click the Heat script and select Duplicate.
- Rename the duplicated script to
Electricity. - Select the Electricity script and open the Properties window.
- Set the Name property to
Electricity. - Set the UniqueStorage property to
1.

Creating an Incubator Placeable
A Placeable is an item that can be placed on certain surfaces and saved to a player's lot across play sessions. The Incubator currently has inventory item data; however, it still needs data for being placed in the Scifi area. The placed Incubator also needs to take in the Electricity Buff and have the properties to be a Producer Base for the Alien Egg.
A Producer Base is a Placeable object that allows a producer to be placed on it and start building the producer.
Placeable Properties
Here are some key properties for a Placeable:
| Property Name | Description |
|---|---|
| UniqueStorageId | Must be unique among Placeables. Used to save data and re-order your Database. |
| Client | A template spawned into the Client context when this Placeable is in the world. |
| Static | A template spawned into the Static context when this Placeable is in the world. |
| PlacementPreview | A template spawned when previewing where to place the item. |
| PlacementOverlapCheckTrigger | A template spawned to check overlap between triggers that allow the item to be placed. |
| PlacementAreaTypes | A list of Placement Area Types that allow this Placeable. If blank, then item can be placed on any area. |
| IsProducerBase | Activate to allow the Placeable to act as a base for a Producer. |
| ProducerBaseType | A string to connect the Producer and Producer Base. |
Create the Client Template
The Client Template for the Incubator is spawned once the item is placed. It will display one of two different art models depending if it is range of the Electricity Buff.
Incubator On and Off Models
There will be two Incubator Models inside the Client Template. One will light up green to signify it is receiving the Electricity Buff, and the other will light up red if it is not receiving the buff.
- Search the Project Content window for the
Incubator (Drop Icon)template. - Drag and drop the Incubator (Drop Icon) template into the scene.
- Right click the template and select Deinstance This Object. Right click the template again and select Abandon Template for Entire Instance.
- Open the Geo folder inside the template.
- Right click the Incubator Model and select Duplicate.
- Rename one of them
Incubator Model Onand rename the other oneIncubator Model Off. - Select Incubator Model On and open the Properties window.
- In the Detail 2 section, set the Color Override property to a green color.
- Select Incubator Model Off and open the Properties window.
- In the Detail 2 section, set the Color Override property to a red color.
Toggle Incubator Model On
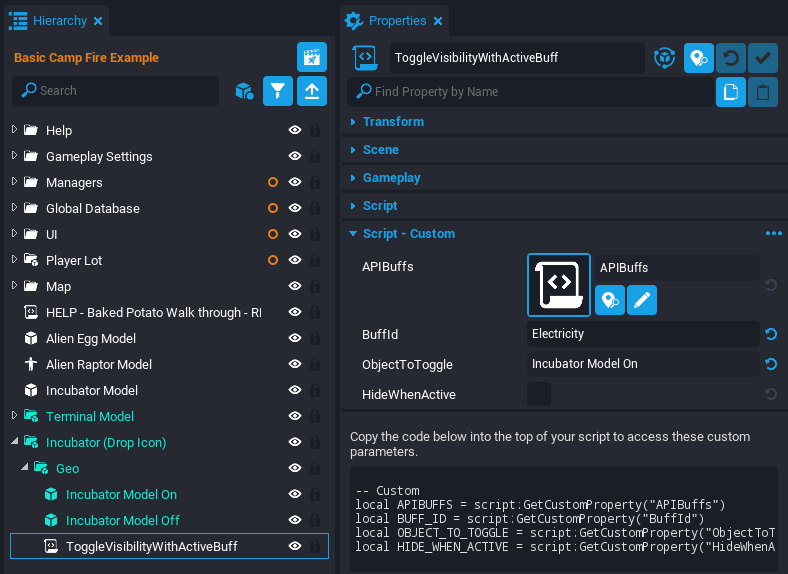
There is a script named ToggleVisibilityWithActiveBuff that can toggle a specific object if the parent Placeable is receiving a certain buff.
- Search Project Content for
ToggleVisibilityWithActiveBuffscript. - Drag and drop the ToggleVisibilityWithActiveBuff script into the Geo group with the Incubator models.
- Select the first ToggleVisibilityWithActiveBuff and open the Properties window.
- Set the BuffID property to
Electricity. - Drag and drop the Incubator Model On into the ObjectToToggle property.
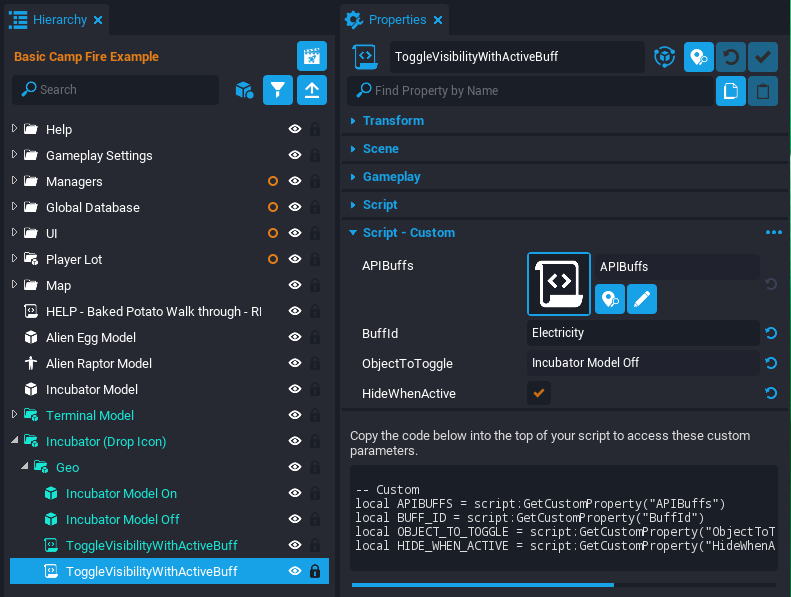
Toggle Incubator Model Off
- Right click the ToggleVisibilityWithActiveBuff script and select Duplicate.
- Select the duplicated ToggleVisibilityWithActiveBuff and open the Properties window.
- Drag and drop the Incubator Model Off into the ObjectToToggle property.
- Activate the HideWhenActive property.
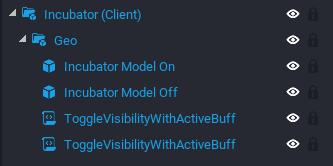
Create the Template
Right click Incubator (Drop Icon) and select Create New Template From This. Name the template Incubator (Client). Delete the Incubator (Client) template from the Hierarchy.
Create the Static Template
Because the Client Context cannot have collision, the Static Template will be an invisible cube that keeps players from walking through the Placeable.
Create a Collision Cube
The Collision Cube needs to activate the Can Overlap Triggers property to avoid overlapping Placeables.
- Search the Project Content window for the
Incubator (Drop Icon)template. - Drag and drop the Incubator (Drop Icon) template into the scene.
- Right click the template and select Deinstance This Object. Right click the template again and select Abandon Template for Entire Instance.
- Search Core Content for a
Cubemesh. - Drag and drop the Cube into the Geo group.
- Transform the Cube to match the dimensions of the Incubator.
- Select the Cube and open the Properties window.
- Activate the Can Overlap Triggers property.
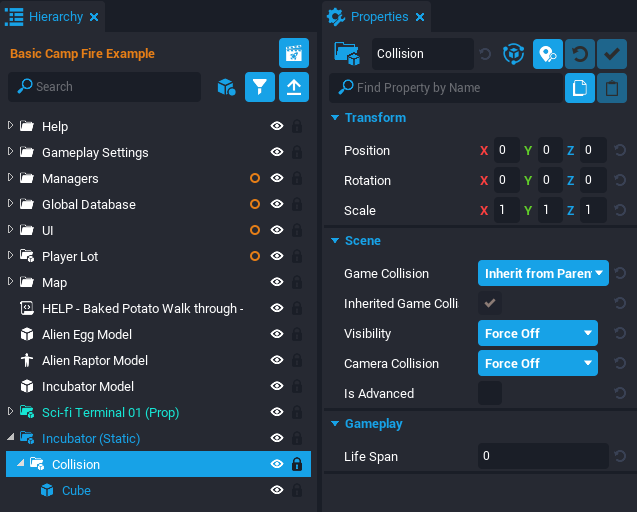
Create a Collision Group
- Inside the Geo group, delete the Incubator Model.
- Select the Geo group and rename to
Collision. - Select the Collision group and open the Properties window.
- Set Game Collision property to Inherit from Parent.
- Set Visibility property to Force Off.
- Set Camera Collision property to Force Off.
- Right click Incubator (Drop Icon) and select Create New Template From This.
- Name the template
Incubator (Static). - Delete the Incubator (Static) template from the Hierarchy.
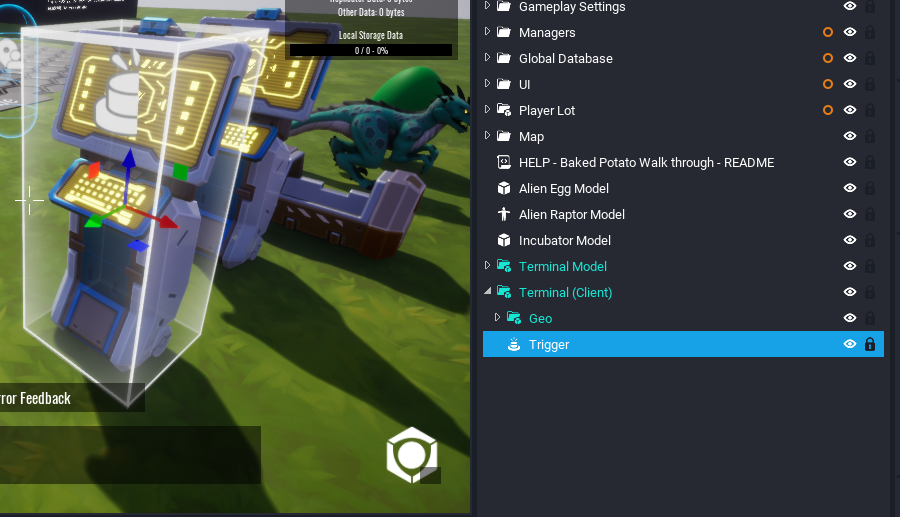
Create the Trigger Template
The Trigger Template will use triggers to check if a Placeable is going to overlap other triggers when being placed.
Create the Trigger
- Search the Project Content window for the
Incubator (Drop Icon)template. - Drag and drop the Incubator (Drop Icon) template into the scene.
- Right click the template and select Deinstance This Object. Right click the template again and select Abandon Template for Entire Instance.
- Search Core Content for a
Trigger. - Drag and drop the Trigger into the Incubator (Drop Icon) template.
- Transform the Trigger to match the dimensions of the Incubator Model.
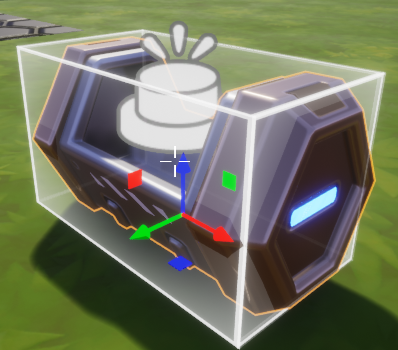
Create the Template
- Inside the Incubator (Drop Icon) template, delete the Geo Group.
- Select the Trigger and open the Properties window.
- Set the Game Collision property to Force On.
- Right click Incubator (Drop Icon) and select Create New Template From This.
- Name the template
Incubator (Trigger). - Delete the Incubator (Trigger) template from the Hierarchy.
Create the Incubator Placeable Data
In the Hierarchy, open the Global Database folder and expand the Placeables script. Right click the Cooking Spit script and select Duplicate. Rename the duplicated script to Incubator.

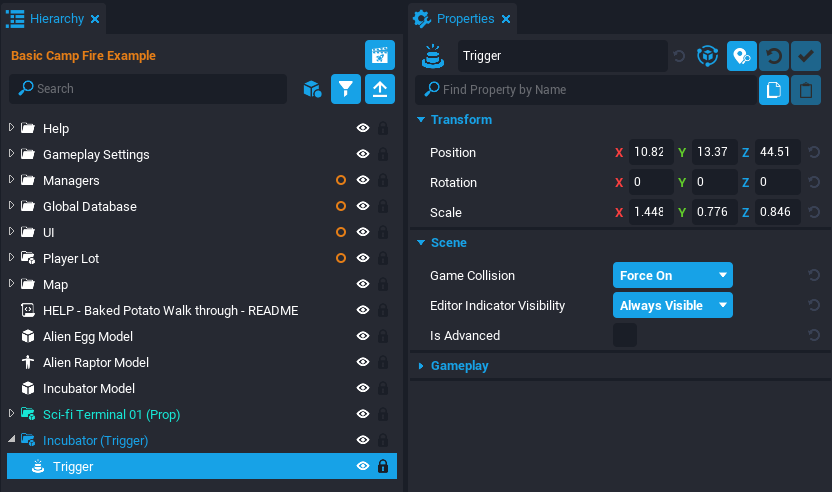
Reference the Input Buff
Expand the Incubator script and then expand the InputBuffs script. Rename the Heat script to Electricity.
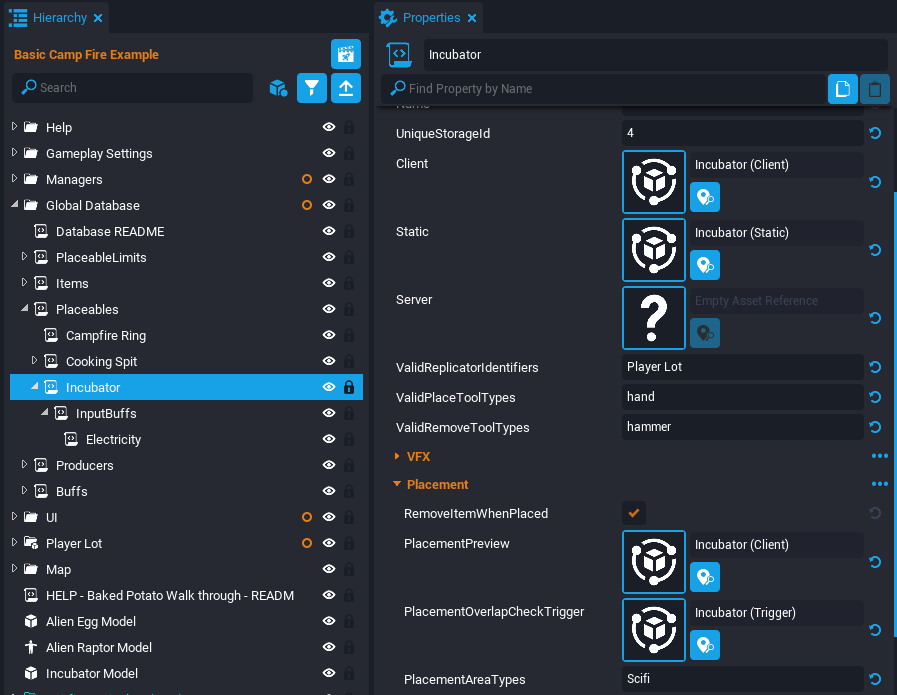
Set the Properties
- Inside the Placeables group, select the Incubator script and open the Properties window.
- Set the UniqueStorageId property to
4. - Set the Client property to
Incubator (Client). - Set the Static property to
Incubator (Static). - Set the PlacementPreview property to
Incubator (Client). - Set the PlacementOverlapCheckTrigger property to
Incubator (Trigger). - Set the PlacementAreaTypes property to
Scifi. - Set the ProducerBaseType property to
Incubator.
Test the Incubator Placeable
Preview the project and wipe the player data by pressing F1.
Test the following:
- Incubators can be placed only on the Scifi area.
- Incubators cannot be placed on other Incubators.
- Placed Incubators are saved across play sessions.
- Incubators show a red light because Terminals are not placeable yet.
Creating a Terminal Placeable
The Terminal Placeable emits the Electricity Buff to nearby placed Incubators.
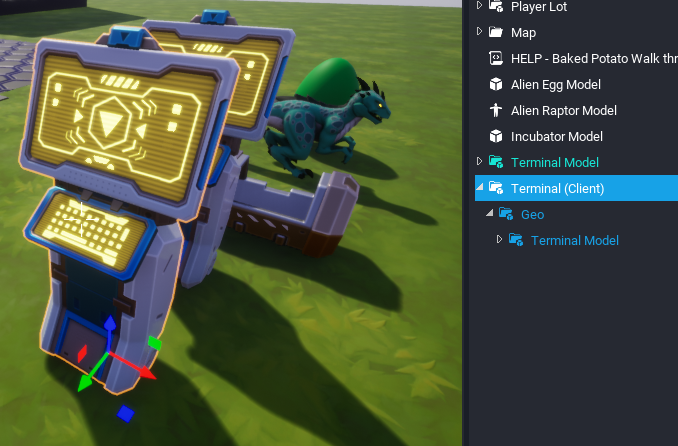
Create the Client Template
The Terminal (Drop Icon) was scaled down to look more like a pickup, but the Placeable Client Template needs to be larger for the in-game size.
- Search Project Content for the
Terminal (Drop Icon)template. - Drag and drop the Terminal (Drop Icon) template into the scene.
- Right click the template and select Deinstance This Object. Right click the template again and select Abandon Template for Entire Instance.
- Scale up the Terminal Model to the in-game size.
- Right click the Terminal (Drop Icon) template and select Create New Template From This.
- Name the new template
Terminal (Client).
Create the Static Template
The Static Template is an invisible cube that handles collision.
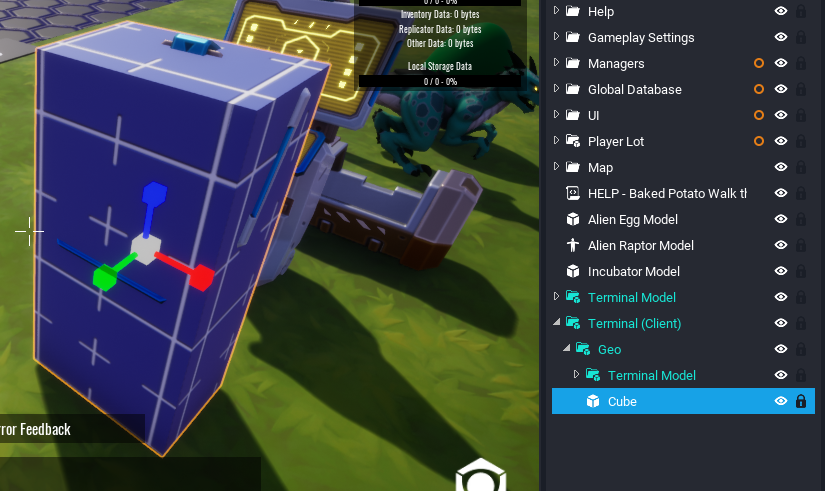
Create the Collision Cube
The Collision Cube will use the Terminal (Client) template as a size reference.
- Right click the Terminal (Client) template and select Deinstance This Object. Right click the template again and select Abandon Template for Entire Instance.
- Search Core Content for a
Cubemesh. - Drag and drop the Cube into the Geo group.
- Transform the Cube to match the dimensions of the Terminal.
- Select the Cube and open the Properties window.
- Activate the Can Overlap Triggers property.
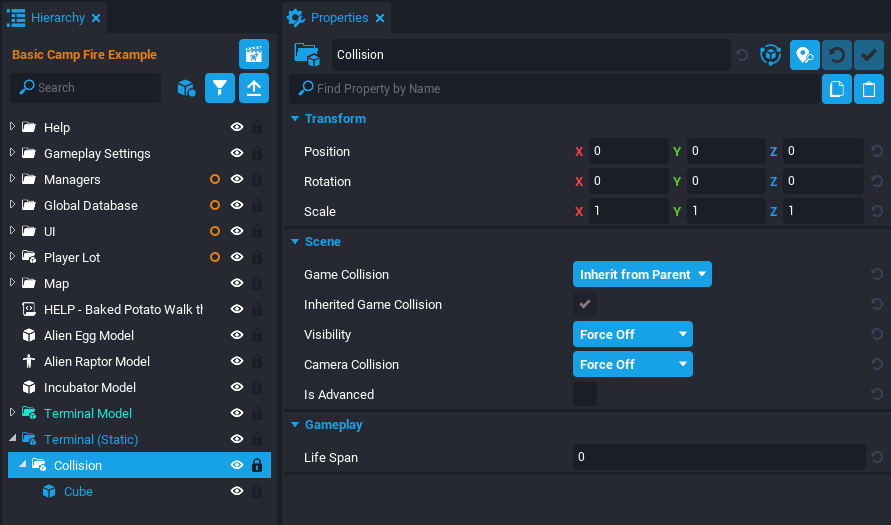
Create the Collision Group
- In the Geo group, delete the Terminal Model.
- Select the Geo group and rename to
Collision. - Select the Collision group and open the Properties window.
- Set Game Collision property to Inherit from Parent.
- Set Visibility property to Force Off.
- Set Camera Collision property to Force Off.
- Right click Terminal (Client) and select Create New Template From This.
- Name the template
Terminal (Static). - Delete the Terminal (Static) template from the Hierarchy.
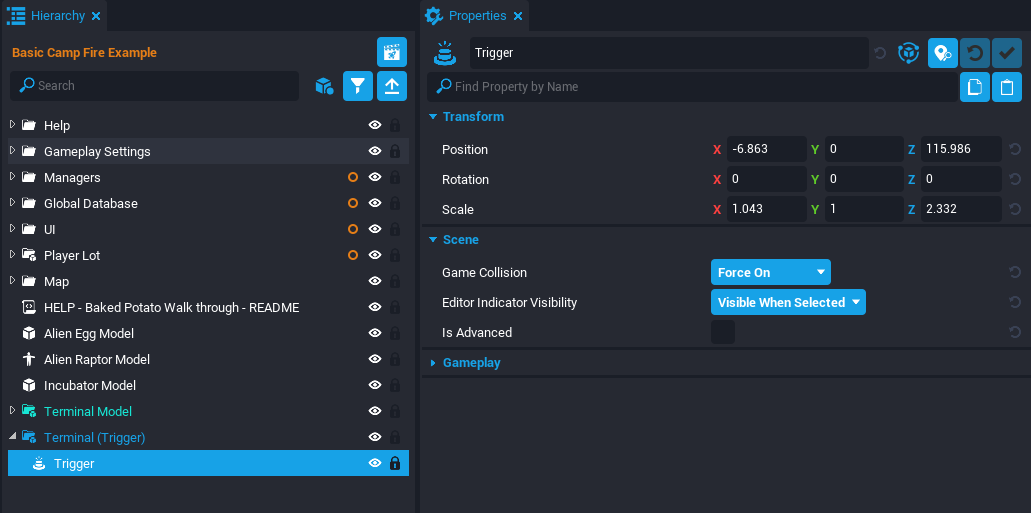
Create the Trigger Template
Create the Trigger
- Search the Project Content window for the
Terminal (Client)template. - Drag and drop the Terminal (Client) template into the scene.
- Right click the template and select Deinstance This Object. Right click the template again and select Abandon Template for Entire Instance.
- Search Core Content for a
Trigger. - Drag and drop the Trigger into the Terminal (Client) template.
- Transform the Trigger to match the dimensions of the Terminal Model.
Create the Template
- Inside the Terminal (Client), delete the Geo Group.
- Select the Trigger and open the Properties window.
- Set the Game Collision property to Force On.
- Right click Terminal (Client) and select Create New Template From This.
- Name the template
Terminal (Trigger). - Delete the Terminal (Trigger) template from the Hierarchy.
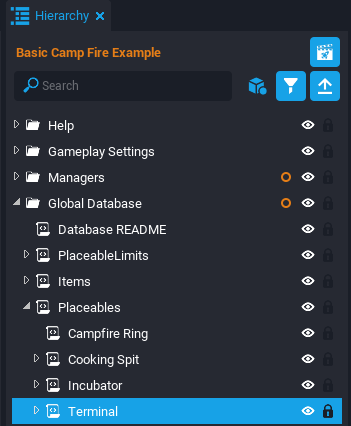
Create the Terminal Placeable Data
In the Hierarchy, open the Global Database folder and expand the Placeables script. Right click the Cooking Spit script and select Duplicate. Rename the duplicated script to Terminal.
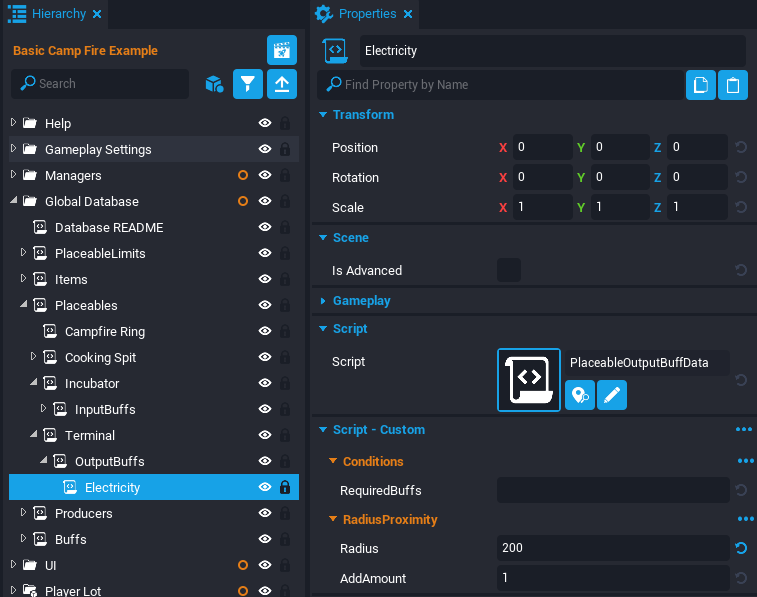
Reference the Output Buff
The Terminal Placeable requires an Output Buff data so it can emit the Electricity Buff.
- Expand the Terminal script and delete the InputBuffs child script.
- Right click Terminal and select Create followed by Create New Script.
- Name the script
OutputBuffs. - Search Project Content for
PlaceableOutputBuffDatascript. - Drag and drop the PlaceableOutputBuffData script into the Hierarchy so it's a child of OutputBuffs.
- Rename the PlaceableOutputBuffData script to
Electricity. - Select Electricity and open the Properties window.
- Set the Range property to
200.
The Range property is the radius length of the Output Buff.
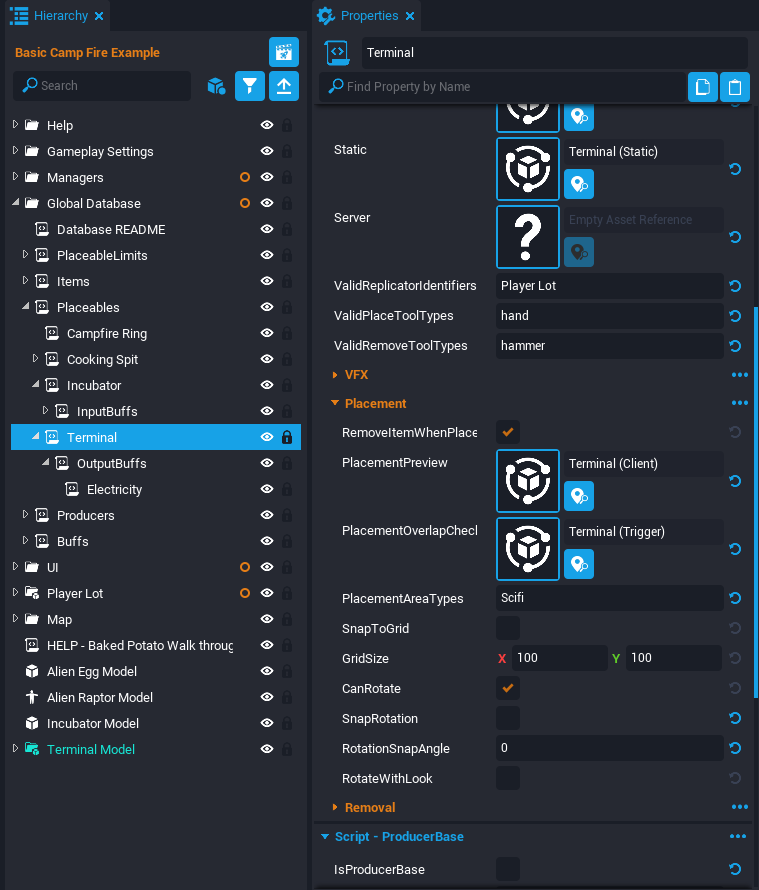
Set the Properties
The Terminal Placeable is not be a Producer Base so the properties need to reflect that.
- Inside the Placeables group, select the Terminal script and open the Properties window.
- Set the UniqueStorageId property to
5. - Set the Client property to
Terminal (Client). - Set the Static property to
Terminal (Static). - Set the PlacementPreview property to
Terminal (Client). - Set the PlacementOverlapCheckTrigger property to
Terminal (Trigger). - Set the PlacementAreaTypes property to
Scifi. - Deactivate the IsProducerBase property.
Testing the Placeables
Preview the game and attempt to place the Terminal and Incubator objects on the ground.
The following should work:
- Placeables can only be placed on the Scifi area.
- Incubator lights up green if within the Terminal radius.
- Incubator lights up red if not within Terminal radius.
- Placeables should be prevented from being placed on one another.
- Players should have collision with placed objects.
- Placeables should be saved across game sessions.
Creating an Incubating Egg Producer
The Incubating Egg Producer allows an Alien Egg to be placed on the Incubator. It also handles producing drops such as the Alien Raptor and Burnt Egg.
Examine Producer Properties
Producer Phases
A Producer uses phases to control the produced drops and the visuals.
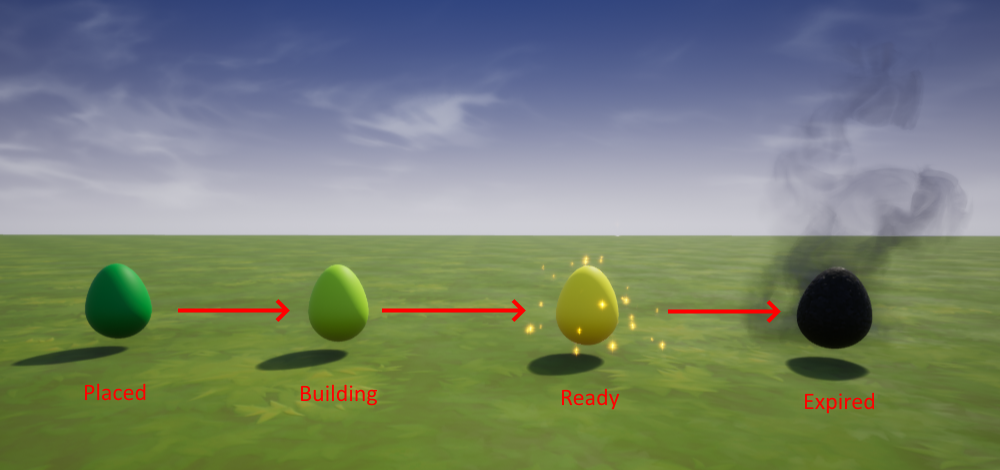
These are the four phases being used for the Incubating Egg:
| Phase Name | Description |
|---|---|
| Placed | When a player places the egg on the incubator it enters this phase. |
| Building | If a placed egg is receiving the Electricity Buff, then it begins the building phase. |
| Ready | Once the building phase has gone on for a couple seconds, it is now ready to be harvested. |
| Expired | If not harvested when ready for a couple more seconds, then the egg expires and becomes burnt. |
Producer Phases
Producers can use more phases such as Rebuilding or custom phases. Search for the Producers & Buffs README script in Project Content to learn more.
Producer Properties
Producers have properties to track the template for each phase. They also connect the Source Item to the Producer Base which starts the production.
Here are some of the properties for Producers:
| Property Name | Description |
|---|---|
| PlacedState_Client | The template spawned in Client context when the Placed phase happens. |
| State1_Client | The template spawned in Client context when the Building phase happens. |
| ReadyState_Client | The template spawned in Client context when the Ready phase happens. |
| ExpiredState_Client | The template spawned in Client context when the Expired phase happens. |
| UniqueStorageId | Must be a unique number among Producers. |
| SourceItemId | The Item that needs to be equipped to place the Producer. |
| NumberOfSeeds | The amount of Source Items consumed when placing the Producer. |
| ValidProducerBaseTypes | A list of Producer Base types the Producer can be placed on. |
| PlacementPreview | The template used to display a preview of the placed Producer. |
Create Placed Template
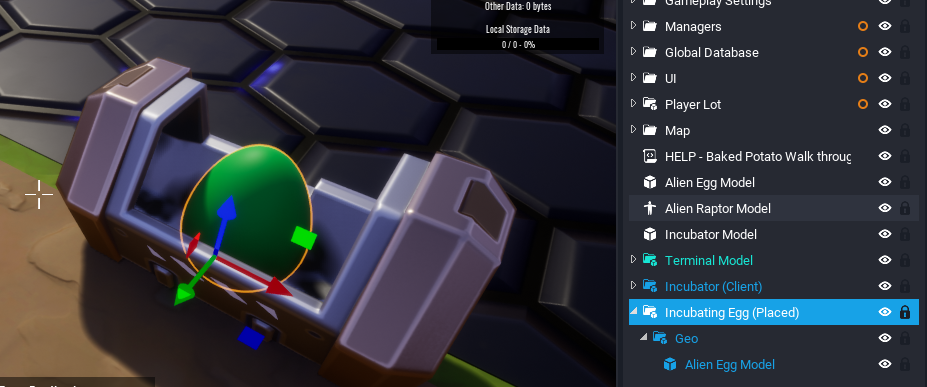
The Phase Templates use the same egg shape but have different materials and effects. The Placed Template is going to setup the position and size of the egg shape for the rest of the templates. The egg shape needs to use the Incubator Template to find the desired placement position.
- Type
incubator clientinto the Project Content search to find Incubator (Client) and drag into the Hierarchy. - Type
alien egg dropinto the Project Content search to find Alien Egg (Drop Icon) and drag into the Hierarchy. - Move and scale the Alien Egg Model to fit inside the Incubator.
- Right click Alien Egg (Drop Icon) and select Create New Template From This.
- Name the template
Incubating Egg (Placed).
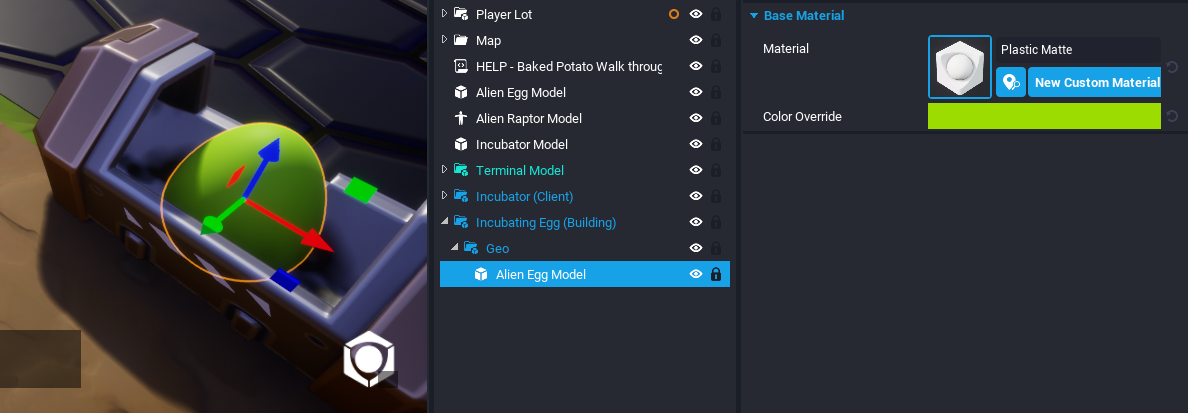
Create Building Template
Select the Alien Egg Model inside the Incubating Egg (Placed) and open the Properties window. Set the Color Override property to a lighter color. Right click Incubating Egg (Placed) and select Create New Template From This. Name the template Incubating Egg (Building).
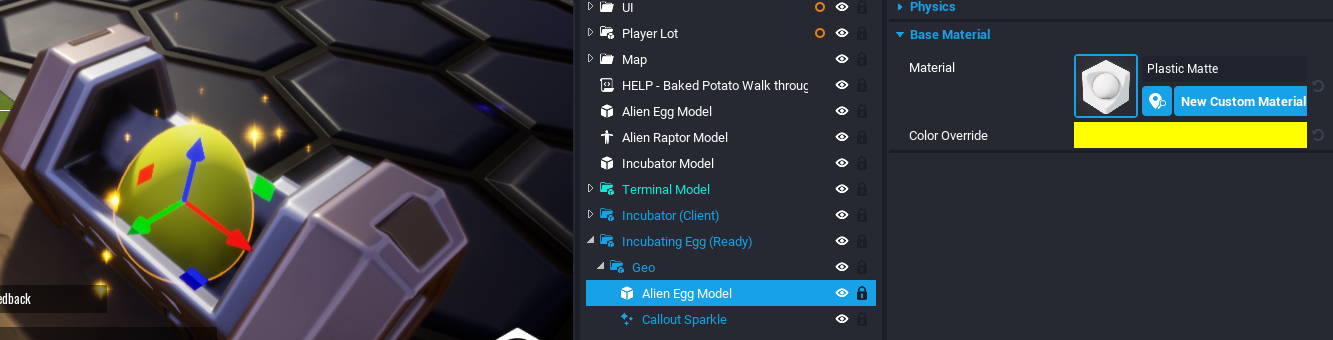
Create Ready Template
When the Incubating Egg is ready to be collected, the Ready Template can display a visual effect (VFX) to encourage players to collect it.
- Right click the Incubating Egg (Building) template and select Deinstance This Object. Right click the template again and select Abandon Template for Entire Instance.
- Select the Alien Egg Model inside the Incubating Egg (Building) and open the Properties window.
- Set the Color Override property to a golden color.
- Search Core Content for the
Callout SparkleVFX. - Drag and drop the Callout Sparkle into the Geo folder.
- Right click Incubating Egg (Building) and select Create New Template From This.
- Name the template
Incubating Egg (Ready).
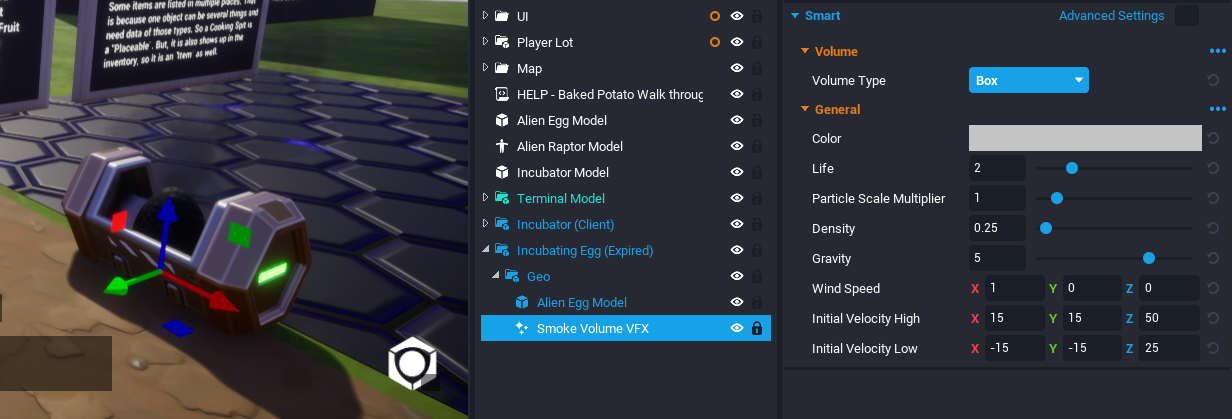
Create Expired Template
The Expired Template will have a Smoke VFX to signify the player was too late to harvest the egg.
- Right click the Incubating Egg (Ready) template and select Deinstance This Object. Right click the template again and select Abandon Template for Entire Instance.
- Select the Alien Egg Model inside the Incubating Egg (Ready) and open the Properties window.
- Set the Color Override property to black.
- Set the Material property to
Asphalt 01. - Delete the Callout Sparkle VFX.
- Search Core Content for the
Smoke Volume VFX. - Drag and drop the Smoke Volume VFX into the Geo folder.
- Select the Smoke Volume VFX and open the Properties window.
- Set the Life property to
2. - Set the Density to
0.25. - Right click Incubating Egg (Ready) and select Create New Template From This.
- Name the template
Incubating Egg (Expired). - Delete the Incubating Egg (Expired) and Incubator (Client) from the Hierarchy.
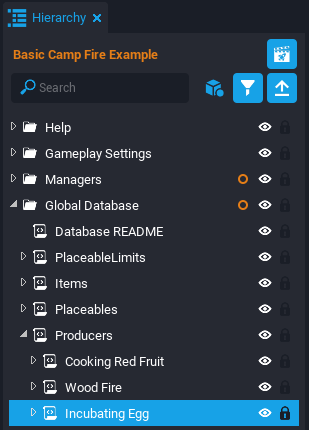
Create the Producer Data
Open the Global Database folder and expand the Producers script. Right click the Cooking Red Fruit script and select Duplicate. Rename the duplicated script to Incubating Egg.
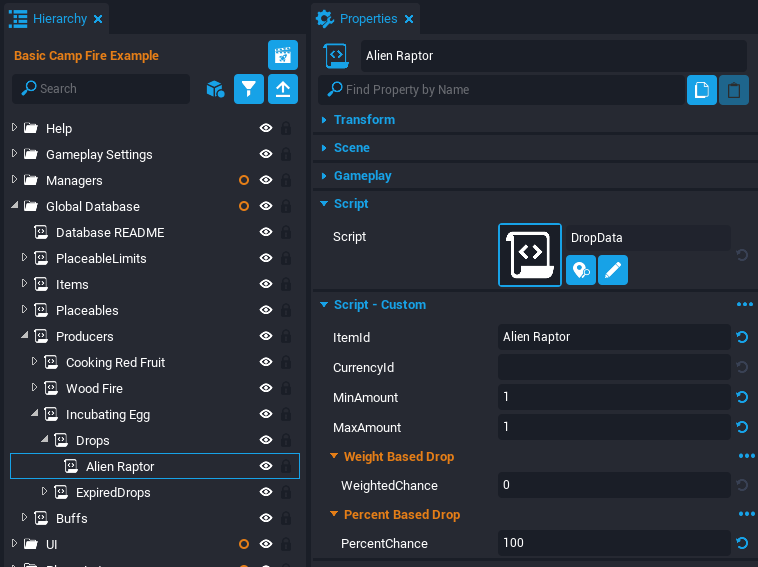
Reference the Drops
Expand the Incubating Egg script and then expand the Drops script. Rename the Cooked Fruit script to Alien Raptor. Select the Alien Raptor script and open the Properties window. Set the ItemId property to Alien Raptor.
Reference the Expired Drops
Expand the ExpiredDrops script under the Incubating Egg script. Rename the Charcoal script to Burnt Egg. Select the Burnt Egg script and open the Properties window. Set the ItemId property to Burnt Egg.
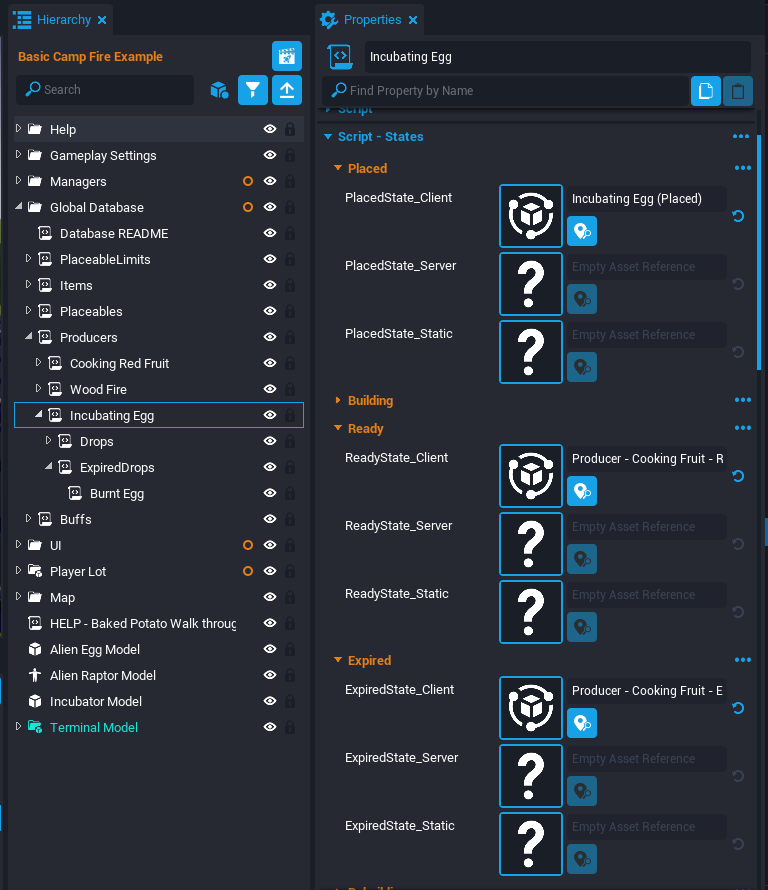
Change the Producer Properties
Phase Template Properties
The Incubating Egg does not need collision so the Static Templates can all be removed.
- Select the Incubating Egg script under the Producers script and open the Properties window.
- Set the PlacedState_Client property to
Incubating Egg (Placed). - Revert PlacedState_Static property to default by pressing the button on the far right .
- Set the State1_Client property to
Incubating Egg (Building). - Revert State1_Static property to default by pressing the button on the far right .
- Set the ReadyState_Client property to
Incubating Egg (Ready). - Revert ReadyState_Static property to default by pressing the button on the far right .
- Set the ExpiredState_Client property to
Incubating Egg (Expired). - Revert ExpiredState_Static property to default by pressing the button on the far right .
Additional Producer Properties
Below the Phase Template properties, there are more properties regarding the producer.
- Set the UniqueStorageId property to
4. - Set the SourceItemId property to
Alien Egg. - Set the NumberOfSeeds property to
1. - Set the ValidProducerBaseTypes property to
Incubator. - Set the PlacementPreview property to
Incubating Egg (Placed).

Test the Incubating Egg
Preview the project and make sure to press F1 to reset the player data. The player should be able to incubate an alien egg into an alien raptor or a burnt egg based on the incubation time.
Summary
The Producers, Buffs, and Areas example project is a powerful and robust system that can be used in many different games. This tutorial only covered a fraction of the features available. There are more scenes that can be explored and broken apart.
Here are some more game ideas that can be created using this framework:
- A survival game requiring the player to eat, drink, and stay warm.
- A city tycoon game where businesses thrive in certain areas.
- A player owned house that can save furniture placed.
Learn More
Producers, Buffs, and Areas Reference | Gatherables and Inventory Reference | Templates Reference | VFX Tutorial | UI Reference